Creating and Controlling Flash Animation with XML
4In the following Flash tutorial we will continue our series about Flash and XML by creating animation in Flash CS5 using XML without the need to do any timeline animation. The tutorial introduces the tips in a simple steps and ends with the final code of the animation that you can download at the end of the Flash tutorial.

Imagine controlling animation without creating timeline Keyframes. No No… you might be thinking of AS3 code with complex logic involving several math equations. But it is not. Yes… with one of Adobe’s innovative combining power of ’AS3 Animator class and XML’ added to Flash you can create and tweak animation of a given target (or targets).
The mechanism is simple. Create XML having nodes those are accepted by AS3 Animator Class for e.g <Keyframe> </Keyframe>. This XML node tells animator class to add a Keyframe. This tutorial is focused on the same area.
Related posts:
- Create Your First Android AIR App in Flash
- How to Create a Snake Game in Flash Using AS3
- Creating Reflection in Flash Using AS3
- Bitmap Data Manipulation in Flash ActionScript 3
- How to Build a XML Driven Quiz Application in Flash
- Approach to Understand XML and Flash Workflow
Before that we shall deal with an interesting feature ‘Copy Motion as ActionScript 3.0’ added to a Timeline’s context menu having Motion Tween. This is actually a script consist an Instance of animator class and XML storing data regarding Classic Tween done in a Flash Timeline. Those who already know this technique may also find some useful tricks.
Adobe Flash CS5 is required to complete this tutorial.
Step1: Copy Motion as ActionScript 3.0
In this step we shall see an interesting feature available in Flash Copy Motion as ActionScript 3.0. To use this feature you must have some timeline animation using classic tween. So our first task is to do some simple timeline animation. While doing this we shall also understand some Flash terms of animation those will help us to build XML for animation.
1) Create a new Flash Document with ActionScript 3.0. (640 x 480 and 30 fps)
2) We shall do a simple ‘Classic Tween’ animation of rectangle. So draw a rectangle of medium size placed at stage center.
3) Select the rectangle and press F8 or go to Modify>Convert to Symbol and select anyone type. I choose a ‘Graphic’ because it is best suited for this step.
4) Click on frame 30 and press F6 to create a Keyframe.
5) To use Copy Motion as ActionScript 3.0 you must have tween applied to every key frame. So select all part in Timeline you just created (either click on a layer name or select first Keyframe and while holding SHIFT click on last Keyframe i.e 30).
Right –Click anywhere in the span of 0-30 frames and choose Create Classic Tween as shown below.
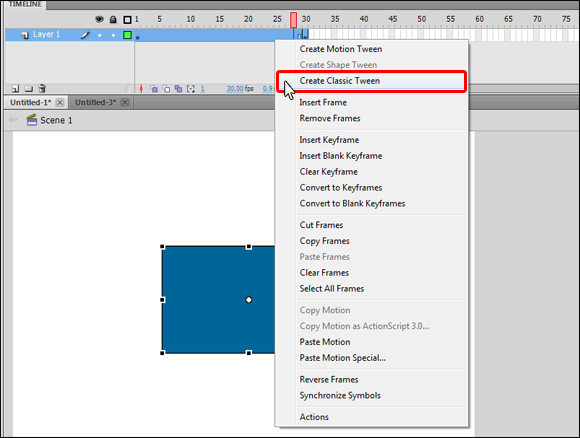
6) Click on Keyframe 1 and select a rectangle. Press ‘Q’ to enabled Free Transform Tool and scale down the rectangle around 50%. (You can also use Transform Panel). We have added a scaling animation to a rectangle.
7) Now select whole Tweened span (i.e 0 to 30). (either click on a layer name or select first Keyframe and while holding SHIFT click on last Keyframe i.e 30).
8) Right-Click anywhere in the selected span and choose Copy Motion as ActionScript 3.0 form the context menu as shown.
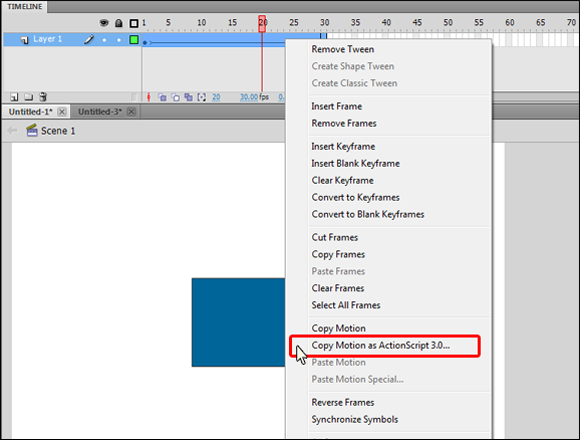
9) After clicking on Copy Motion as ActionScript 3.0 a dialog box will appear prompting for instance name. Type the instance name as ‘myObject’ and press OK.
Curious? Hmmm ….we have copied a motion in the form of script. Once a script is copied, you can reuse or modify it to control or create animation of other instances. Don’t copy anything else now, as we want to keep it in a clipboard. In next step we shall paste this copied script in a new Flash file.
Step2: XML with Animator Class instance
In this step we are going to explore the copied script. This will help us at the time when we shall be creating XML file for controlling animation.
1) Once again create a new Flash Document with ActionScript 3.0. (640 x 480 and 30 fps).
2) Press F9 to open Action Script panel and paste the code we copied as explained in Step1.
3) Don’t get disturbed or panic after seeing the code. Initially it looks complex but if you observe it carefully you will see that it is nothing but the XML file created in AS3 and passed it to an instance of animator class.
4) Observe the last two lines of the code, If you remember the instance name ‘myObject’ specified in previous step. You will see that instance name in the code as shown below (bold word).
.
.
.
var myObject_animator:Animator = new Animator(myObject_xml, myObject);
myObject_animator.play();
5) Close Action Script panel by pressing F9 again.
6) Draw a circle with no outlines (use outlines only if necessary) and convert it to Movieclip symbol. Give it the same instance name ‘myObject’ to attach the above script to our new circle object.
7) Press CTRL+ENTER (win) or CMD+ENTER (mac) to test the movie.
Interesting! The animation of a rectangle is applied to all time new object circle.
This was just the introduction. Perform next step to observe it more closely.
Step3: Understanding XML with Animator Class instance
To understand this code, first simplify it by removing <Source> ……</Source> node from the XML and remove attributes from <Motion>..</Motion>. Also remove ‘tweenSnap’ attribute from all <Keyframe> nodes as we don’t required them here. (To avoid this, next time uncheck ‘Tween Snap’ option in Properties panel when tweened Keyframe is selected).
Now the code will be simple as shown below,
import fl.motion.Animator;
var myObject_xml:XML = <Motion>
<Keyframe index=”0 scaleX=”0” scaleY=”0”>
<tweens>
<SimpleEase ease=”0″/>
</tweens>
</Keyframe>
<Keyframe index=”29″ scaleX=”2″ scaleY=”2″>
<tweens>
<SimpleEase ease=”0″/>
</tweens>
</Keyframe>
</Motion>;
var myObject_animator:Animator = new Animator(myObject_xml, myObject);
myObject_animator.play();
Those who are familiar with XML structure will find this code very easy.
Don’t worry if you are unfamiliar with XML. You are at right place, yes GraphicMania. Read Part1- Approach to understand Flash and XML workflow the fastest way to learn Flash and XML workflow.
Back to our code. If you observe this code you will find several XML nodes and child nodes.
The root node:
<Motion> </Motion>
Child Nodes of the above root node:
<Keyframe> </Keyframe>
<Keyframe> </Keyframe>
The count of <Keyframe> node is ‘2‘because we created animation having ‘2’ keyframes. One at start i.e Keyframe 1 and Second at Keyframe 30.
Child Nodes of the above <Keyframe> </Keyframe> nodes:
<tweens> </tweens>
These nodes together with <SimpleEase ease=”0″/> adds Motion Tween to a specified target.
Attribute of <Keyframe> nodes:
<Keyframe index=”0” scaleX=”0” scaleY=”0”> </Keyframe>
<Keyframe index=”29” scaleX=”2” scaleY=”2”> </Keyframe>
Why Index = “0” and index = “29” ? Think… Index = “0” creates Keyframe at 1 and index = “29” creates Keyframe at 30. scaleX and scaleY creates scaling animation.
Attribute of <SimpleEase /> node:
<SimpleEase ease=”0″/>
This attribute ‘ease’ takes care of applying easing to our XML driven animation. Here it is ‘0’ because we did not change it at the time of animation.
If you don’t know easing, then do some Classic Tween animation in a Timeline.. Select a tweened Keyframe and look for ‘Ease’ under TWEENING group in properties panel. Try changing the Ease values and observe the change in a flow of animation.
Warm up your hands! Now we are going to create XML from scratch to control animation in Flash.
Step4: Creating XML to control animation
You will find this step easy if you had not skip the above Step5.
Brief discussion about what we are going to do from here onwards.
We shall build an animation of a text appearing on a screen.
We shall also add a beauty to our text through XML.
We shall do two things,
a) XML file.
b) Basic Flash Document (Load external XML file and control Flash symbols).
Let us start with creating XML.
1) Create folder ‘XMLAnimation’.
2) Open your favourite XML editor (I suggest Adobe Dreamweaver) and create new document for XML editing. Add following Root nodes to XML.
<Motion>
</Motion>
Save this XML by naming it as ‘ControlAnimation.xml’ in a folder ‘XMLAnimation’
3) We shall create 2 Keyframes to animate scaleY, first at 1 and second at 20 for our animation. This can be done by adding child nodes and attributes as shown below, (Bold lines)
<?xml version=”1.0” encoding=”UTF-8”?>
<Motion>
<Keyframes index = “0” scaleY=”0”>
</Keyframes>
<Keyframes index = “19” scaleY=”1”>
</Keyframes>
</Motion>
4) After adding Keyframes it is necessary to apply motion tween so as to create animation. So we shall add child nodes of <Keyframe> nodes as shown (Bold lines).
<Keyframes index = “0” scaleY=”0”>
<tweens>
</tweens>
</Keyframes>
<Keyframes index = “19” scaleY=”1”>
<tweens>
</tweens>
</Keyframes>
5) One more child node and attribute for each <tweens> node and we are ready with our initial setup. (Bold lines)
<Motion>
<Keyframes index = “0” scaleY=”0”>
<tweens>
<SimpleEase ease = “-1”/>
</tweens>
</Keyframes>
<Keyframes index = “19” scaleY=”1”>
<tweens>
<SimpleEase ease = “0”/>
</tweens>
</Keyframes>
</Motion>
Here we have applied easing to our animation soon we are going to see.
Observe attribute ease =’-1’ of first <SimpleEase> node. Suppose you are doing classic tween animation having two keyframes. This is equal to the effect in Flash timeline when you set ‘ease: -100’ for starting Keyframe of animation.
We have created a basic XML structure to control animation. In coming steps we shall add more features to this XML.
My Favourite! Flashing. Yes its time for Flashing now.
Step5: Preparing Flash symbol for animation
In this step we shall create Flash file containing text field as a movieclip. This movieclip is our target symbol for XML file created in the above step4.
We shall also add a script to load XML and apply animation to the text symbol.
So let us start,
1) Create new Flash Document for ActionScript 3.0 and save it in the same folder where the XML file ‘ControlAnimation.xml’ is saved. i.e folder ‘XMLanimation’.
2) Adjust stage size 900 x 540. Stage BGColor ‘Black’ and FPS 30.
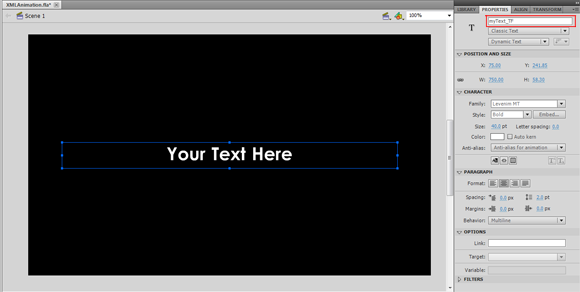
3) Add a Dynamic Text Field to the stage placed at centre and instance name ‘myText_TF’ as shown. Keep Text Color white.
4) With the text field selected press F8 and convert it to a Moviclip symbol with registration point center as shown.
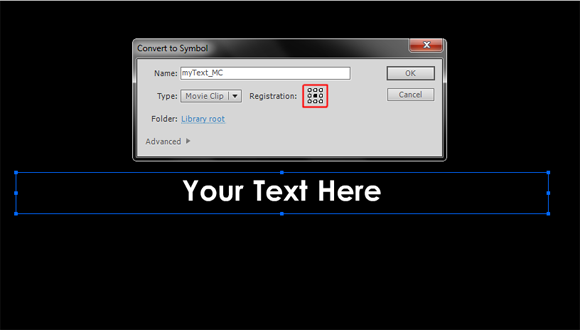
5) Give instance name ‘myText_MC’ to this movieclip. So we now have one movieclip ’ ‘myText_MC’ with textfield ‘myText_TF ’inside it.
Step5: Adding AS3 to apply XML animation
In this step we shall create Action Script to control animation of the movieclip created in the above step.
Add the following code to the first and only keyframe.
import fl.motion.Animator;
var xmlLoader:URLLoader = new URLLoader(new URLRequest(“ControlAnimation.xml”));
xmlLoader.addEventListener(Event.COMPLETE, _onXMLLoad);
var xml:XML;
var xmlAnimator:Animator;
var xmlList:XMLList;
var xmlChildren;
function _onXMLLoad(e:Event):void {
xml = new XML(xmlLoader.data);
xmlList = new XMLList(xml);
xmlChildren = xmlList.children();
xmlAnimator = new Animator(xml,myText_MC);
if (xmlAnimator != null) {
xmlAnimator.play();
}
}
CTRL+ENTER(Win) / CMD+ENTER(Mac) to test the movie.
Fine! Animation is added without creating timeline keyframes and also without complex math.
Step6: Modifying Flash symbol through XML
In this step we shall modify our Textfield symbol by inserting external Text.
We shall modify both the Action Script and XML. So first modify XML as shown below, (Bold area)
<Motion>
<Keyframe index = “0” scaleY = “0” myText = “Graphic Mania”>
<tweens>
<SimpleEase ease = “-1” />
</tweens>
</Keyframe>
.
.
.
</Motion>
We have added attribute ‘myText’ at first keyframe. We are going to insert the value of this attribute (here ‘Graphic Mania’) into our Textfield symbol.
Now modify function ‘_onXMLLoad ‘ in ActionScript as shown below, (Bold line)
function _onXMLLoad(e:Event):void {
xml = new XML(xmlLoader.data);
xmlList = new XMLList(xml);
xmlChildren = xmlList.children();
myText_MC.myText_TF.text = xmlChildren[0].@myText;
xmlAnimator = new Animator(xml,myText_MC);
if (xmlAnimator != null) {
xmlAnimator.play();
}
}
Perfect! We can now insert any text into our symbol without Flash.
Step6: Adding Effects to Flash symbol through XML
In this step we shall add Glow and Bevel effects to our symbol.
First let’s add Glow filter. So we shall modify XML as shown,(Bold Lines)
<Motion xmlns:filters=”flash.filters.*”>
<Keyframe index = “0” scaleY = “0” myText = “Graphic Mania”>
<tweens>
<SimpleEase ease = “-1” />
</tweens>
<filters>
<filters:GlowFilter blurX=”0″ />
</filters>
</Keyframe>
<Keyframe index = “19” scaleY = “1” >
<tweens>
<SimpleEase ease = “0”/>
</tweens>
<filters>
<filters:GlowFilter blurX=”255″ />
</filters>
</Keyframe>
</Motion>
At starting keyframe blurX=”0” and at last keyframe blurX=’255’. Similarly you can tweak blurY, Color as shown,(Bold area)
<filters>
<filters:GlowFilter blurX=”0″ blurY=”0″ color=”0x00FF00″ />
</filters>
.
.
.
<filters>
<filters:GlowFilter blurX=”255″ blurY=”14″ color=”0x00FF00″ />
</filters>
Similarly try adding other Glow Properties such as alpha, strength, quality, inner(Boolean) and knockout(Boolean). Tweak their values and see the effect.
Now we shall add Bevel Filter as shown below, (Bold lines)
<filters>
<filters:GlowFilter blurX=”0″ blurY=”0″ color=”0x00FF00″ />
<filters:BevelFilter distance=”0″ angle=”45″ highlightColor=”0xFFFFFF/>
</filters>
.
.
.
<filters>
<filters:GlowFilter blurX=”255″ blurY=”14″ color=”0x00FF00″ />
<filters:BevelFilter distance=”0″ angle=”45″ highlightColor=”0xFFFFFF/>
</filters>
Similarly try adding other Bevel Properties such as highlightAlpha, shadowColor, shadowAlpha, blurX, blurY, strength, quality, type and knockout(Boolean). Tweak their values and see the effect.
Drama! Added to the scene.
Step7: Improving animation through XML
In this last step we shall modify XML to improve animation as shown below, (Bold area)
<Keyframe index = “0” scaleX = “0” scaleY = “0” myText = “Graphic Mania”>
<tweens>
<SimpleEase ease = “-1” />
</tweens>
<filters>
<filters:GlowFilter blurX=”0″ blurY=”5″ color=”0x00FF00″/>
<filters:BevelFilter distance=”0″ angle=”45″ highlightColor=”0xFFFFFF”/>
</filters>
</Keyframe>
<Keyframe index = “29” scaleX = “1” scaleY = “0.1” >
<tweens>
<SimpleEase ease = “0”/>
</tweens>
<filters>
<filters:GlowFilter blurX=”255″ blurY=”14″ color=”0x00FF00″/>
<filters:BevelFilter distance=”5″ angle=”45″ highlightColor=”0xFFFFFF”/>
</filters>
</Keyframe>
<Keyframe index = “50” scaleX = “1” scaleY = “1” >
<tweens>
<SimpleEase ease = “-1″/>
</tweens>
<filters>
<filters:GlowFilter blurX=”255″ blurY=”14″ color=”0x00FF00″/>
<filters:BevelFilter distance=”2″ angle=”45″ highlightColor=”0xFFFFFF”/>
</filters>
</Keyframe>
That’s it! for now. We have completed our tutorial. Test your movie to see the effect.
Conclusion:
In this Flash tutorial we saw ‘Copy Motion as ActionScript 3.0’. We also learned the script behind this command.
We had a basic look over creating XML for animation and added Filters through XML. Finally we edited animation through XML.
This is now a portable piece ready to use. Modify it as you like and simply run the swf.
[amember_protect guests_only]If you are already a Premium Member then just sign in and you can download the source files of this tutorial.
Not a member? Sign up today or read more about our Premium Member area.
[/amember_protect] [amember_protect user_action=’hide’ visitor_action=’hide’][/amember_protect]




The link to the source code doesn’t work….pointing to HTTTP
<a href="htttp://www.graphicmania.net/wp-content/uploads/05012011/02/XMLanimation.zip"
Oh, I am sorry. It is fixed now. Can you check again? Thanks alot!!
Found another relatively simpler way to do the same,posted at http://bbso.wordpress.com/2012/01/16/loading-xml-in-flash-as3
cant get to source files.