Tips to Use Photoshop Smartly and Efficiently
10
Adobe Photoshop involves in every computer related career. As a widely used image editor application, you can find graphic designer, photographers, web designers, video and animation specialists and even developers use it regularly in either projects. And many people use it to edit their own images to upload to social networks or even their own profiles.
Adobe Photoshop extended to be more than just an image editing program, it can help you to save your web page as HTML, create animation, vector art and 3D graphics.
Most of the Photoshop users may know how to achieve there task, but there are hidden tips and tricks behind Photoshop that can help you achieve your task easily and fast. Also, from the background of work with Photoshop tasks, there are common tasks and commands that are used often and usually. If you can achieve these tasks fast, you will be able to reduce the time of your Photoshop project or task. For example, if you have multiple files to resize, you do not have to open each file to resize it individually, instead you can resize all the files at once. In this article, I will point to the hidden features in Photoshop that many people may miss and it can help you getting you job done in fewer time and effort.
Adobe Bridge
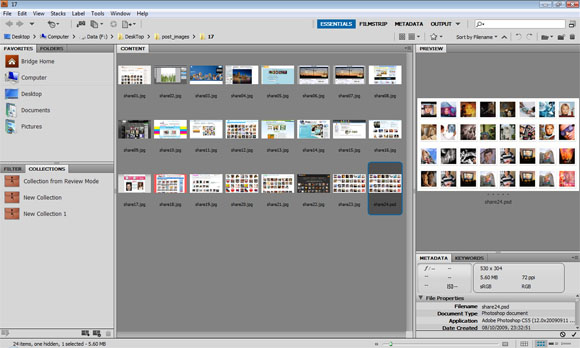
Adobe Bridge comes by default with Photoshop and you can reach it from the stand alone icon or from inside Photoshop. Adobe Bridge can help you navigate for your graphic resources and images at your local machine. Adobe Bridge allows you to preview your images and open it in its associated applications easily. For example, you can preview Photoshop PSD files and open it in Photoshop by simple double-clicks it.
The Preview panel in Adobe Bridge allows you to preview the images in any size and you can view them as a slide show. Further, Adobe Bridge lets you archive your images resources and add metadata content for it to reach and organize it. The Metadata panel in Adobe Bridge can help you add information to each image and you can also save images as favorite to reach it later in less time.
One of the most useful features in Adobe Bridge is the batch rename, which lets you bulk rename files based on specific criteria. You can simply batch rename any selected files by right-click the files and choose Batch Rename. The Batch Rename dialog box appears to let you choose how to set the new name sequence. For example, you can set the name sequence based on date, number, specific text and number if digits…etc.
Actions
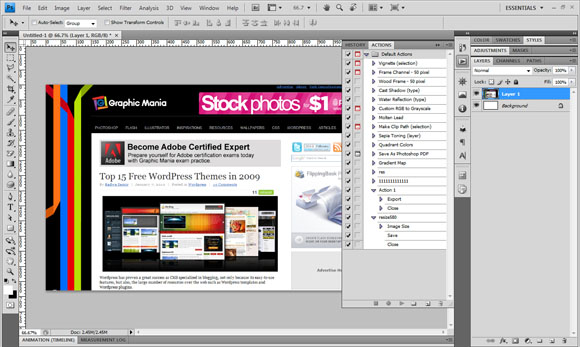
Photoshop actions are rerecorded steps that are saved as ACN format and let you apply these steps again and again on other file or files to reach the same effect. You can do this without the need to repeat the steps to reach the needed results automatically with no need to repeat steps. You can manage Actions, record actions, play current actions and review the built-in action through the Action panel.
The bottom icons in the Action panel allows you easily record new actions through the record icon and stop the action once you finish recording the steps you do in Photoshop. Each action has a unique name so you can access it easily through the Actions layers. Each action has its layers that show each step in the action. You can edit the value of the step such as a filter value, resize size…etc.
With the ability to record new actions, you can load external actions through the Action panel context menu that let you load external action in ATN format. You can download free Photoshop actions from the links below:
The Big Collection Of Amazing Photoshop Actions
Photoshop Actions Free Download Collections
Automate
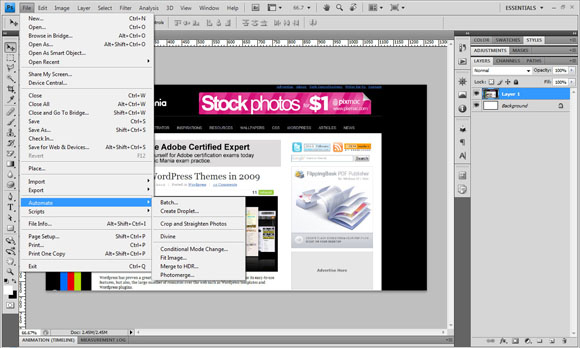
The Automate menu is an extension for the Action panel to give you more abilities using some useful actions to apply files. The Automate commands are similar to actions, but it is located in the File > Automate command. The Automate commands include useful actions that can help you so much to archive your tasks easily and fast. For example, the Batch command, Create Droplet and Merge to HDR…etc.
One of the most commonly used Automate command is the Batch command, which lets you apply a specific action to folder of files and save it in the same location or different location. With the Batch command, the Create Droplet command let you create an external icon that link to a specific action in Photoshop. However, when you drag any image to this droplet icon, Photoshop opens and apply the action to this image. This command is useful when you need to apply an action such as resize to any image on desktop or downloaded image directly.
Scripts
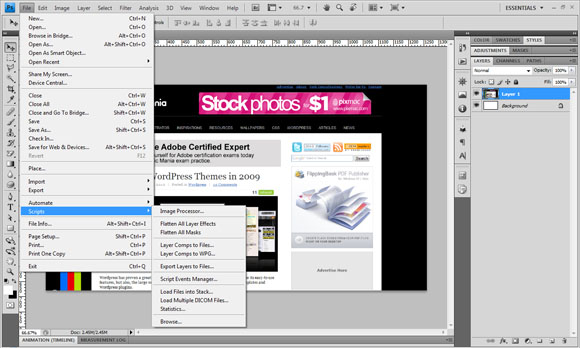
Adobe Photoshop integrates with the Adobe Java Script language. However, Adobe Photoshop includes scripts that give you smart solutions through number of built in scripts. You can reach the scripts through the File > Script menu. Scripts menu include useful commands such as the following:
- Image processor, this command lets you convert images format to between different commonly use formats.
- Flatten All Layers Effects, this command allows you to flatten all layer effects in one step.
- Flatten All layer Masks, this command allows you to flatten layer masks.
- Layer Comp to Files, this command converts the layer compositions to separated image files with different formats.
- Export Layers to Files, when you have a file with different layers and you would like to separate each layer in an image files, you can use this command to convert all the layers to files in one step.
- Load Files into Stack, this option reverses the previous one as it coverts multiple files into one Photoshop file with each image in a separate layer.
In the Scripts menu, you can find the Script Event Manager where you can create new scripts.
Layer Comp
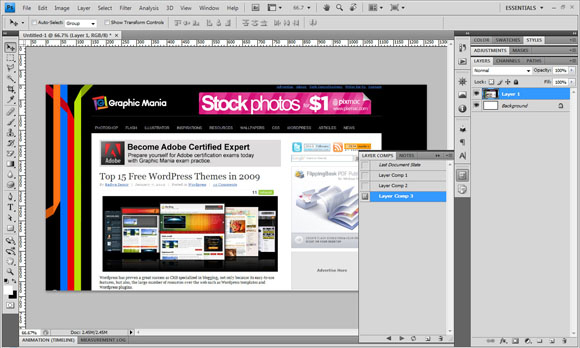
Layer Comp panel is a smart panel where you can save through it different views of your Photoshop layers visibility. For example, if you are working in a design and would like to show the client different arrangement of objects, you do not have save every view in a separate Photoshop file. All you need to do is to save different layers arrangements or visibility as different Layer comp and then use the Layer Comp to Files script to expert these layer comps to images.
To save a new layer arrangement as a layer comp, just click the new icon in the bottom of the Layer Comp panel. You can navigate between views through the arrows in the bottom of the Layer Comp panel. Also, you can delete it by just dragging it to the trash icon.
Save for Web and Devices
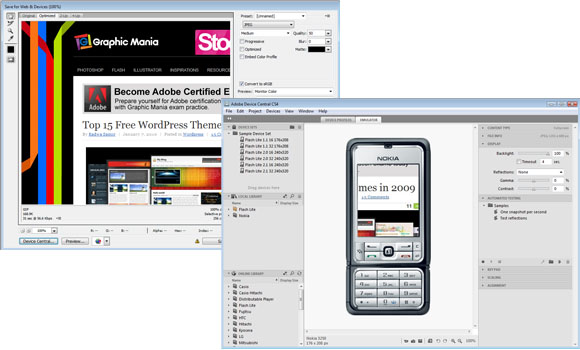
The Save for Web and Devices option lets you not only optimize your design to meet with the web file size requirements, but also to prepare your design to be added or sent to mobile for testing. This way, you can see how it will look like on different types of mobile devices. However, instead of testing your design on a real mobile device, you can basically test how your design will look like through the mobile emulator in Adobe Device Central. You can reach it by clicking the Device Central on the bottom left of the Save for Web dialog box. The Save for Web dialog box allows you to optimize your image size, quality and number of colors to meet your requirements.
Conclusion
Doing tasks in Photoshop professionally are not just related to how to use the tool, it depends on how you can use these tools smartly to achieve you task in short effect time. And since the workflow in Photoshop include both creative tasks and tasks that are commonly used to save your files, optimize them..etc. The best approach it is be able to do the common task with a smart way to reduce its time and give more time to your creativity. The total result will be a more creative Photoshop project that is done in less time and effort.




[…] This post was mentioned on Twitter by Rafiq Elmansy and PhotogZone, Hicham Taoufikallah. Hicham Taoufikallah said: RT @rafiqelmansy: Tips to Use #Photoshop Smartly and Efficiently: http://ow.ly/TQHN […]
Social comments and analytics for this post…
This post was mentioned on Twitter by 100twits: tips to use #photoshop smartly and efficiently http://feedproxy.google.com/~r/GraphicMania/~3/gyLEMV2OLAs/…
[…] Read more here: Tips to Use Photoshop Smartly and Efficiently | Flash, Design … […]
[…] link: Tips to Use Photoshop Smartly and Efficiently | Flash, Design … Share and […]
This article has been shared on favSHARE.net. Go and vote it!
.-= favSHARE´s last blog ..WordPress Usability: Plugins That Make Your Blog More Visitor Friendly =-.
[…] Read the original article […]
[…] Tutorials Every Beginner Should See 3. 60+ Fresh Hot New Tutorials From Around The Web 4. Tips to Use Photoshop Smartly and Efficiently 5. Design a Light WordPress Theme in Photoshop 6. 23 Professional Facial Photoshop Retouching […]
[…] tutorials in the Photoshop section and you may like to check these other collections as well: Tips to Use Photoshop Smartly and Efficiently30 Fabulous Photoshop Wallpaper Tutorials40+Impressive Photoshop Text Effects TutorialsCreative […]
nice post. thanks.
Great tips for Photoshop. I never knew about the Adobe Bridge Photoshop.