How to Create a Snake Game in Flash Using AS3
32It is the time for a new Flash tutorial. Our tutorial today covers how to create a full snake game in Flash using AS3
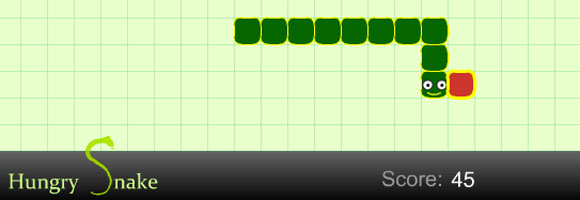
In this Flash tutorial, we will go step by step in creating the AS3 game and learn how to build its code in the below steps. At the end of the tutorial, you can download the game source code.
Related posts:
- Create Your First Android AIR App in Flash
- Creating Reflection in Flash Using AS3
- Bitmap Data Manipulation in Flash ActionScript 3
- Creating and Controlling Flash Animation with XML
- How to Build a XML Driven Quiz Application in Flash
- Approach to Understand XML and Flash Workflow
The final result of the game should look like below:

Step1 Preparing Flash
Create a new Flash file for Actionscript3.0.
Set the stage size to 550 x 550 px.
Set frame rate to 30 fps.
Save this file as Snake.fla in a folder of your choice (it’s a good idea to create a new folder).
Step2 Creating Game Objects
For this game we need to prepare the following objects (symbols):
1) Head (Snake’s head),
2) BodyPart (Snake’s Vertebrae),
3) Food (Snake’s prey),
4) Tile (To create a grid as background),
So let us create these objects. First, we shall create the snake’s head.
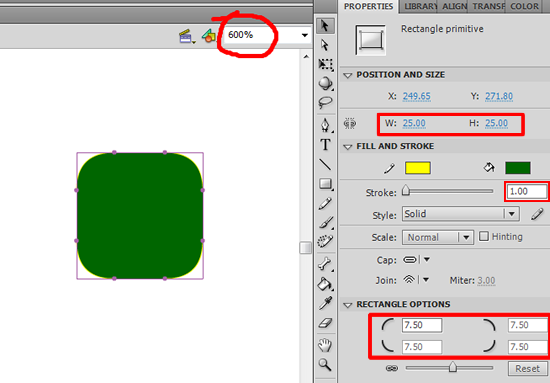
Draw a rounded rectangle the size of 25 x 25. Set the corner radius to 7.50 and the stroke thickness to 1.
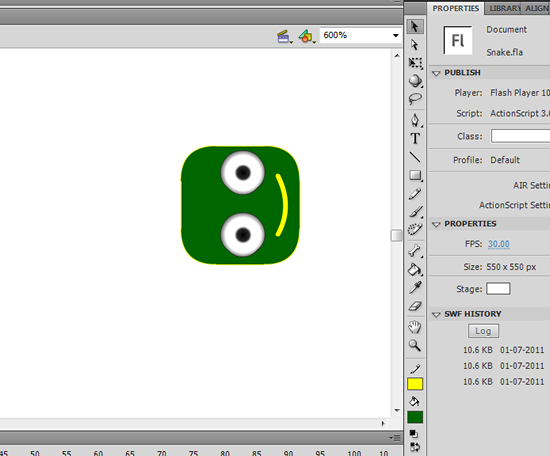
Feel free to improve the snake head’s graphics as per your choice. I added eyes and a mouth as shown. But take care to keep the size it inside a 25×25 rectangle, because size is the key here.
Now we need to convert all these head graphics into a single MovieClip symbol so that we can control it with the help of ActionScript3.0.
Select all the above objects and go to Modify>Convert to Symbol, or press F8.
In the “Convert to Symbol” dialog box, select the type “MovieClip” and give it the instance name “Head”. Do not forget to set the registration point as centre. This is a very important step as all the necessary calculations will be based on this centre point of the snake’s head.
Then check “Export for ActionScript”. Now the class name must read “Head”.
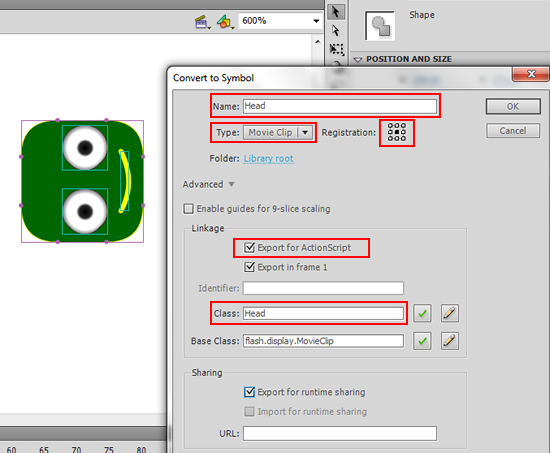
With all the above settings done press “OK”. Press “OK” again if the ActionScript Class definition dialog box appears. This creates a Class definition for the “Head” symbol at runtime.
Now the “Head” symbol is in the library panel. So we can delete it as we no longer need it on the stage. The stage should be empty now.
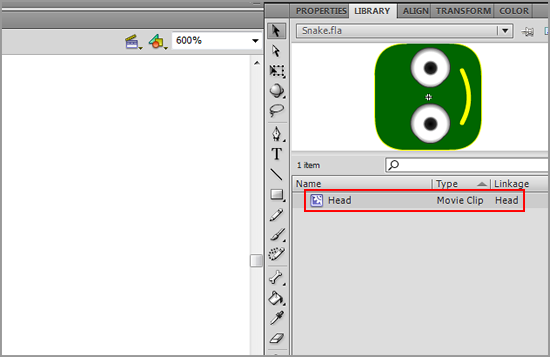
Let’s move on. It’s time to create the “BodyPart”. There is not much difference between “BodyPart” and “Head”, except the eyes and mouth.
Similarly to the “Head”, the “BodyPart” is created with a rounded rectangle the size of 25×25, and corner radius of 7.50. Stroke thickness is 1.
Also, convert this “BodyPart” into MovieClip symbol.
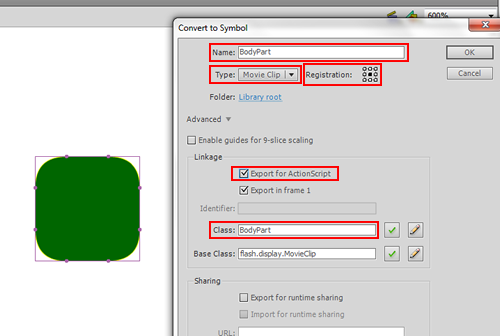
The rest of the steps are similar to that of the “Head”.
So now the stage must be empty and the “BodyPart” has been added to library panel.
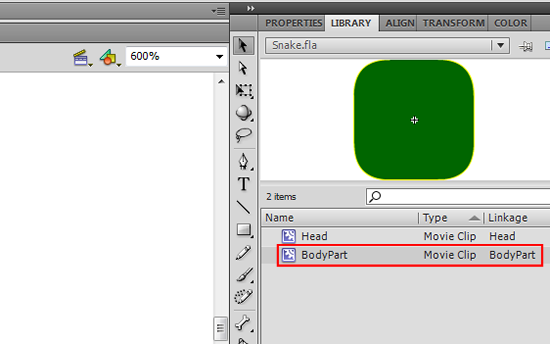
Similarly, the other two objects, viz. “Food”,“Tile” are created on the stage.
To create ‘Food”, we will use similar steps that we used to create “BodyPart”. Keep the size the same, 25×25, but the color of the “Food” symbol must be different than that of the “BodyPart”.
To create the “Tile”, use a rectangle instead of a rounded rectangle with the same size of 25×25.
(Note: Keep the registration point as the centre for both objects at the time of the MovieClip creation.)
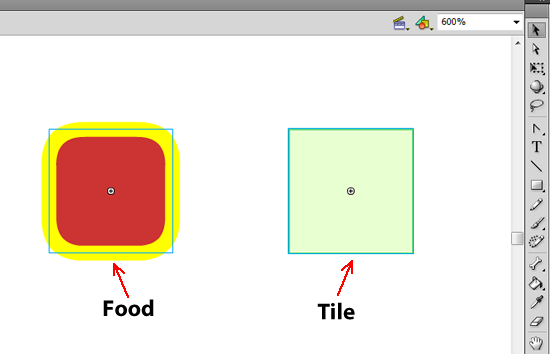
After converting these objects into MovieClip symbols as “Food” and “Tile” respectively, the library panel will look like the one shown below, (Note: Your stage must be empty).
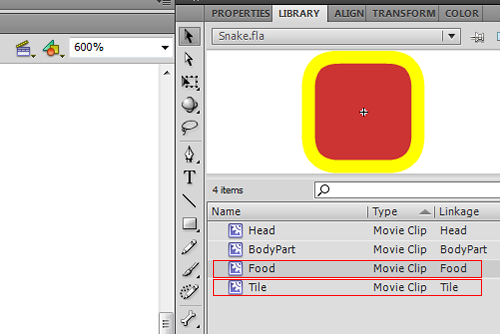
Excited…. Now all the required game objects are ready and waiting to perform. Before that, we need to place the “HUD” design, which will display the title of the game and score.
Step3 Preparing “HUD”
The hud is used for displaying game statistics. In our case we shall place the score and title of the game in this area. The bottom part of the stage is the best place to put the “HUD” as shown below:
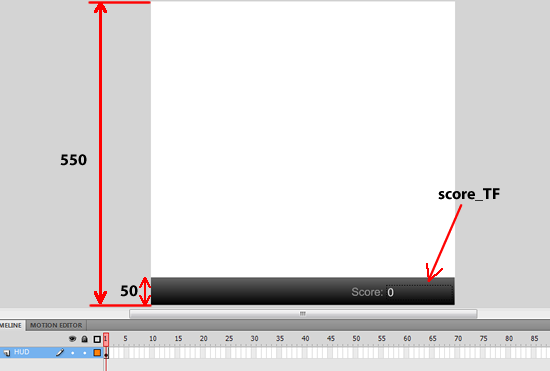
As you can see above, the dark gray rectangle of height 50 is representing the hud area. It is placed so that the bottom line of the hud touches the bottom edge of the stage.
Also note that the label “Score:” is placed on the left. It is a Static type TextField. In front of this label the Dynamic type TextField is placed, which will display the score. The instance name of this text field is “score_TF”. Do not forget to embed the font for this text field. It’s ok to include only “numerals” for this font in the embedding options, since we will only use it for displaying the score.
To improve the look you may place the title of the game on top of this hud as shown:

Curious…. to see what next? The basic structure of the game is ready. From the next step onwards, we are going to put all the logic needed to run this game. We shall create a game background to start with. So it’s time to do some smart ActionScripting now.
Step 4 Creating a grid of tiles as background
This step is not that necessary for the game, but placing tiles in the background will give a visual sense to the player.
Since the “Tile” symbol is already stored in the library, we need to get it and place this symbol on the stage. To create a grid we shall use ActionScript and manipulate this “Tile” symbol.
So let us create a new empty layer. Select the first and only keyframe and go to Window>Actions, or press F9. Type the following code in the ActionScript panel.
var headWidth:Number = 25; //width of snake head
var hudHeight:int = 50; //height of the hud placed at bottom of the stage
var columns:Number = stage.stageWidth/headWidth; //total num of columns for grid
var rows:Number = (stage.stageHeight – (hudHeight))/headWidth; //total num of rows for grid
//Create grid of tiles
function grid(): void
{
for(var i:int = 0; i < rows; i++){
for(var j:int = 0; j < columns; j++){
var tile:Sprite = new Tile(); //get tile from the library
//Arrange tiles to form a grid
tile.x = (headWidth/2) + (j * headWidth);
tile.y = (headWidth/2) + (i * headWidth);
addChild(tile);
}
}
}
grid();
Test the movie.
Nice….. The background is there. Now what shell we do next?
Step 5 Snake’s head and its random positions
In this step we shall manage the random positions of the snake’s head for every new start of the game.
First we need to get the “Head” from the library and place it on the stage. Therefore we have to declare some new variables as shown below:
var head:MovieClip; //holds snake’s head
var headX:Number; //head’s x position
var headY:Number; //head’s y position
var partsArr:Array = new Array(); //holds Snake’s head and body parts
The variables are ready. Now we shall get the “Head” from the library and place it.
We need to create an “ini()” function, in which we are going to put some startup requirements.
So back to the ActionScript panel. Now, below the “grid()” function, type the following code:
//Initialization
function ini():void
{
//Get and place snake’s head from the library
head = new Head();
addChild(head);
//Push Snake’s head into parts array
partsArr.push(head);
//head’s random position for every new start
headX = Math.ceil(((stage.stageWidth – headWidth)/(headWidth))*Math.random())*headWidth;
headY = Math.ceil((((stage.stageHeight-hudHeight) – headWidth)/(headWidth))*Math.random())*headWidth;
//Since the head’s pivot is at the centre, adjust its position
head.x = headX – headWidth/2;
head.y = headY – headWidth/2;
}
ini();
Test the movie a couple of times to see how the starting position of the snake’s head changes each time you start the game.
Wow…. thanks to ”Math.random()” method for making the task so simple.
Step 6 Snake’s food (prey) and its random positions
Similarly to the snake’s head, we need to put food for the snake on the stage, but at random positions for each new start of the game.
If you observe we need to place some new food every time the snake eats the food. For such an action you might think we will need to create new instance of food every time and position it on the stage.
But instead of creating a new instance of food every time, we will only create it once and simply keep changing its positions (of course randomly), whenever the snake eats the food.
First, we shall declare a new variable for the food as shown below:
var food:Sprite; //holds snake’s food
Now, for creating an instance of the food, the “ini()” function is the best place.
So let us modify the ‘ini()” function as shown below (bold lines),
//Initialization
function ini():void
{
.
.
.
.
//previous code
//Since the head’s pivot is at the centre adjust its position
head.x = headX – headWidth/2;
head.y = headY – headWidth/2;
//Get and place food from the library
food = new Food();
addChild(food);
}
Now it’s time to place the food.
In this case we shall create new function “newFood()”, because we need to place food every time the snake eats it. We can simply call this “newFood()” function in this situation.
But first we have to declare some new variables as shown below:
var foodX:Number; //food’s x position
var foodY:Number; //food’s y position
var foodWidth:Number = headWidth; //same as snake’s head for a sake of game play
Now, below the “ini()” function, type the new function “newFood()” as shown below,
//Place the food at random position
function newFood():void
{
foodX = Math.ceil(((stage.stageWidth-foodWidth)/(foodWidth))*Math.random())*foodWidth;
foodY = Math.ceil((((stage.stageHeight-hudHeight)-foodWidth)/(foodWidth))*Math.random())*foodWidth;
food.x = foodX – foodWidth/2;
food.y = foodY – foodWidth/2;
//Find new position each time when food is overlapping snake’s any body part
for (var i:int = partsArr.length-1;i > 0; i–)
{
if(food.x == partsArr[i].x && food.y == partsArr[i].y){
newFood();
}
}
}
While creating this “newFood()” function you have to consider one case when the any body part of the snake, including the head, might get overlapped with food, while assigning the new place for food. It is very much possible to get the same value for the food’s position and the snake’s position. This will affect the game, because player will not be able to see the food and also it is not a good game strategy.
To solve the problem, we added “for(..)” loop as a quick solution. It checks the total body parts inside “partsArr” in reverse order as, (you can also check it in forward direction)
for ( var i:int = partsArr.length-1; i > 0; i– )
Then it starts comparing the foods’ “x” and “y” positions with all the body parts’ “x” and “y” positions as,
If ( food.x == partsArr[ i ].x && food.y == partsArr[ i ].y ){
newFood();
}
If the positions of any part are found to be the same, the “newFood()” function calls itself. This will go on until such a condition is met where the food’s position and each body part’s position is different.
The job is not finished yet. We still need to call this “newFood()” function. Yes you are right. The “ini()” function is the right place to call this “newFood()” method at the starting time of the game. So again, we have to modify the “ini()” function as shown below:
//Initialization
function ini():void
{
.
.
.
.
//previous code
//Get and place food from the library
food = new Food();
addChild(food);
//Random position of food
newFood();
}
Test the movie a number of times to see whether the food and the snake’s head are not overlapped. Also, check for their random positions.
Excited….? See the snake, he is dying to eat that food. But you will have to make him move.
Step7 Control the direction of the snake
In this step we are going to see how the snake will change his direction.
The snake will move in four directions i.e. UP, DOWN, LEFT and RIGHT. For this we shall use the four arrow keys on the keyboard. So the “UP” key will change the direction to “UP” and so on.
First let’s declare a new var as,
var direction:String; //set the direction of the snake
Now let’s create a new function “changeDirection()”. So, below the “newFood()” function, write the following code:
//Set snake’s direction
function changeDirection(e:KeyboardEvent):void
{
if(e.keyCode == 37)
{
direction = “left”;
head.rotation = -180;
}else
if(e.keyCode == 38)
{
direction = “up”;
head.rotation = -90;
}else
if(e.keyCode == 39)
{
direction = “right”;
head.rotation = 0;
}else
if(e.keyCode == 40)
{
direction = “down”;
head.rotation = 90;
}
}
stage.addEventListener(KeyboardEvent.KEY_DOWN, changeDirection);
Let’s test the movie.
Wow…. the snake can change its direction to get his prey. But he can’t run. We shall help to make him run.
Step 8 Snake on the move
In this step we are going to introduce a new function “moveSnake()”. This function is a central part where all the necessary checks and decisions will happen. So we must observe its creation and further modifications carefully.
Type the following code in the ActionScript panel:
//Moving snake
function moveHead(e:Event):void
{
if( direction == “left” ){
head.x -= headWidth;
}else
if( direction == “up” ){
head.y -= headWidth;
}else
if( direction == “right” ){
head.x += headWidth;
}else
if( direction == “down” ){
head.y += headWidth;
}
}
The function “moveHead()” is ready, but we still need to call it with its “EnterFrame” event.
When and where to call this code?
See, we do not want the snake to start moving immediately as soon as the game starts. We need to trigger it.
The best case to trigger the snake’s run is any of the arrow keys on your keyboard. Therefore the function “changeDirection(..)” is the perfect place to call. But there will be one condition when the snake should not be in running state. If snake is running then there is no need to add the event again and again.
So first, set the new variable as:
var running:Boolean = false;
Now, modify the :changeDirection()” function as shown below, (Bold lines)
//Set snake’s direction
function changeDirection(e:KeyboardEvent):void
{
.
//previous code
if(!running)
{
stage.addEventListener(Event.ENTER_FRAME, moveHead);
running = true;
}
}
You can test the movie now.
OOPS….. What happened? The speed is too… high. We shall control it in the next step.
Step9 Controlling the speed of the snake
The speed of the snake is very high because we are increasing the width of the head over period of time at 30 fps. Actually, this is needed for the game as we want our snake to move tile by tile.
There are a couple of ways to make the snake move slowly. One of them (not the one used in this tutorial) is controlling the FPS dynamically (as stage.frameRate). With this approach you might need extra arrays for “x” positions and “y” positions. The second way is creating a dynamic delay to make the snake move towards the next tile. Let us see the code for this effect now.
We need some new variables as:
var keyFrame:int;
var frameNum:int = 0; //current frame num
var span:int = 20;//num of frames between two keyframes
Now modify the “moveHead()” function as shown below, (Bold lines)
//Moving snake
function moveHead(e:Event):void
{
keyFrame = frameNum/span;
if(frameNum/span == keyFrame){ //Delay for given time span
if( direction == “left” ){
head.x -= headWidth;
}else
if( direction == “up” ){
head.y -= headWidth;
}else
if( direction == “right” ){
head.x += headWidth;
}else
if( direction == “down” ){
head.y += headWidth;
}
frameNum = 0;
}
frameNum++;
}
Test the movie.
Now it is more controllable. Try with different values for span. The smaller the value, the greater the speed will be.
If you understood how the delay is working then you may jump to the next step. But if you think it is still unclear what exactly the code is doing, go through the following explanation to understand it theoretically.
If you observe there are three vars,
1) var keyFrame:int;
2) var frameNum:int = 0; //current frame num
3) var span:int = 20; //num of frames between two keyframes
To understand what “span” is, we shall use the Flash timeline animation. Take one case where you want to create the similar moving snake animation using Flash timeline. How will you create that? See the image below:
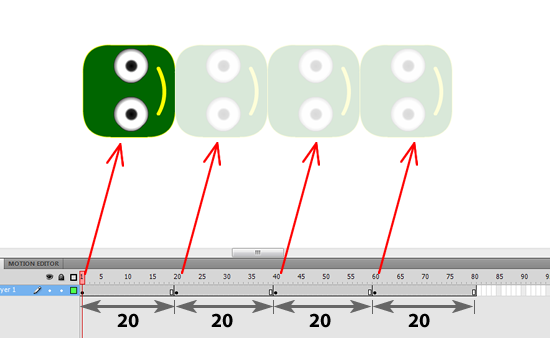
If you create keyframes at every 20 frames (without tweening) as shown above, and change their position similarly to what we did in our game, i.e. equal to the width of the head, then you will have a delay equal to the given span with respect to fps. In our case the span is 20.
Now we understood what span is. What about “var frameNum:Number”? Well if you observe, in the “moveHead()” function we have a statement as:
frameNum++;
This constantly increments “frameNum” by 1. Then we have the “if” statement as,
if(frameNum/span == keyFrame)
If you put values in “frameNum/span” you will find that whenever “frameNum” reaches 20 i.e. equal to given span, the value is equal to 1. Furthermore, if you see the following line which is placed above “if” statement in our code:
keyFrame = frameNum/span;
If you put values in the above statement you will find that whenever “frameNum” reaches 20, again you will get 1.
So, the “if’ statement will look like “if(1 == 1)”. When this condition is met, the code inside the “if” statement executes.
Note that at the end of the “if” statement we put the line,
frameNum = 0;
Since ours is a programmatically created animation, there is no need to create frames like we would in a timeline animation. We can reuse the same span, but have to ensure that the position changes every time at the end of that same span. So once the “frameNum” is reached at 20, we are moving it back to 0. Also, by this approach “frameNum” will not keep increasing unnecessarily.
So I think it is pretty much clear now.
The snake is moving. You can get him near the food. But the snake is unable to eat. We have to help him again to get his food. Follow the next step.
Step10 Snake about to eat
This step will help the snake to grab his prey.
As we discussed earlier, instead of creating new food every time the snake eats the food we shall reuse the same food object, but we shall place it in a different position.
First, let us understand what exactly “eat” means in this game. How will we know that the snake has grabbed his food? The answer is, we will compare the positions of the snake’s head and that of its food. When these match, we will say that the snake has grabbed his food.
But what next? After snake eats his food we need to do three important tasks:
1) Attach a new part to the snake’s body and making it follow the snake,
2) Place the food at new positions,
3) Increase the score.
Let us see how to attach the new part to the snake’s body and make it follow the snake.
We shall introduce a new function as shown below. So type the following code:
//Add new part to the snake’s body
function attachNewPart():void
{
var newPart:Sprite = new BodyPart();
addChild(newPart);
partsArr.push(newPart); //add new part into snake body
}
Now call this “attachNewPart()”function inside “moveHead()”, but only under the condition that the food ‘s position and the snake’s head’s positions are equal.
And combining a power of “for” loop and “partsArr” we shall make the new part follow the snake.
We shall also place the food at random positions, by simply reusing the “newFood()” method we have created earlier.
So modify the “moveHead()’ function as shown below, (Bold lines)
//Moving snake
function moveHead(e:Event):void
{
.
.
//Previous code
//Since we are holding snake’s head on this position for given span,
//This “if” condition ensures the new part addition,
//at the time of leaving current position.
if(frameNum == span-1){
//Check if snake grabbed the food
if(head.x == food.x && head.y == food.y)
{
attachNewPart();
newFood();
}
if(running)
{
//Follow the next part
for (var i:int = partsArr.length-1;i > 0; i–)
{
partsArr[i].y = partsArr[(i-1)].y;
partsArr[i].x = partsArr[(i-1)].x;
}
}
}
frameNum++;
}
Observe the “if(frameNum == span-1)”. This is needed as we want to attach the new part only at the time when the head is leaving its current position. Remember that we are delaying the snake for a given span. If we do not add the above “if” condition, the new part will keep adding for the given span and also stay in the same position. So there will be 20 parts at the same position. We definitely do not want this to happen in our nice and cool game.
Now we will add the scoring to the game. First we will declare a new variable as:
var score:int = 0;
Now, modify the “attachNewPart()” function as shown below, (Bold lines)
function attachNewPart():void
{
var newPart:Sprite = new BodyPart();
addChild(newPart);
partsArr.push(newPart);
score += 5;
score_TF.text = String(score);
}
Ok. Let’s test the movie now.
The snake is the happiest living creature in this world now. He can eat his food and become healthy. But nothing is easy in this world. There are always some difficulties or restrictions. We shall add some restrictions to the snake’s movement in the next step.
Step11 Adding restrictions to the snake’s movement
In this step we shall add some restrictions while the snake is moving. If the snake does not obey these restrictions he will die. What are these restrictions?
1) We will not allow the snake to go beyond the stage area,
2) We will not allow him to penetrate his own body.
Let us add the first restriction to the snake’s movement. Thank god there will be no new variables.
We will create two new functions “restrictSnakeMove()” and “dead()”. These functions are easy and straightforward.
Let us see “restrictSnakeMove()”. Add the following code to your script:
//Reatrict snake movements beyond game play area
function restrictSnakeMove():void
{
//check for all four boundries of the stage
if(direction == “right” && head.x > (stage.stageWidth – headWidth))
{
dead();
}else
if(direction == “left” && head.x < headWidth)
{
dead();
}else
if(direction == “down” && head.y > (stage.stageHeight – hudHeight – headWidth))
{
dead();
}else
if(direction == “up” && head.y < headWidth)
{
dead();
}
}
The above function first checks the direction of the snake, according to which it decides on which side to check the boundary. If it finds a boundary it calls the “dead()” function which we are going to create next.
So let us create the “dead()” function as follows:
//If snake does not obey the game rule he will die
function dead():void
{
running = false;
stage.removeEventListener(Event.ENTER_FRAME, moveHead);
stage.removeEventListener(KeyboardEvent.KEY_DOWN, changeDirection);
}
One more important step and the restrictions will be on. We need to call the “restrictSnakeMove()” function somewhere. But where? Guess… Yes you are right inside the “moveHead()”.
But wait a minute, still inside “moveHead()” requires perfect place to call.
Look for the “if(frameNum == span-1)” statement inside “moveHead()”. We will call “restrictSnakeMove()” immediately after this “if(frameNum == span-1)” statement. So, let us modify the ‘moveHead()” function as shown below, (Bold line)
//Moving snake
function moveHead(e:Event):void
{
.
.
//previous code
if(frameNum == span-1){
restrictSnakeMove();
//Check if snake grabbed the food
if(head.x == food.x && head.y == food.y)
{
attachNewPart();
newFood();
}
if(running)
{
//Follow the next part
for (var i:int = partsArr.length-1;i > 0; i–)
{
partsArr[i].y = partsArr[(i-1)].y;
partsArr[i].x = partsArr[(i-1)].x;
}
}
}
frameNum++;
}
Test the movie.
Looks like a game now….. The snake is blocked inside the stage area.
Step11 Check for self penetration
In this step we will check if the snake is penetrating himself. If this happens, the snake will die.
We will create a new function “penetration()” as shown below:
//Check if snake penetrates himself
function penetration():void
{
for (var i:int = 1; i < partsArr.length; i++)
{
if(head.x == partsArr[i].x && head.y == partsArr[i].y)
{
dead();
}
}
}
The above function checks all body part positions except that of the head (Note, var i:int =1). As soon as any position matches with head’s position, the “dead()” function is called.
Now we need this function to call. But again where? Similarly to the “restrictSnakeMove()” we will call this “penetration()” function below “restrictSnakeMove()”. So let us modify the “moveHead()” function as shown below: (Bold line)
//Moving snake
function moveHead(e:Event):void
{
.
.
//previous code
if(frameNum == span-1){
restrictSnakeMove();
penetration ();
//Check if snake grabbed the food
if(head.x == food.x && head.y == food.y)
{
attachNewPart();
newFood();
}
if(running)
{
//Follow the next part
for (var i:int = partsArr.length-1;i > 0; i–)
{
partsArr[i].y = partsArr[(i-1)].y;
partsArr[i].x = partsArr[(i-1)].x;
}
}
}
frameNum++;
}
Test the movie now.
Very close to a game now…. All the restrictions are applied. What next? How about displaying the “Game Over” message?
Step 12 Display “Game Over” message
This step is all about ending the game.
First, we will create a MovieClip to display the “Game Over” message. It will also have restart button so that player can start the game again if he wants to.
First, we have to draw a nice rounded rectangle of a decent size and color. Then convert this rectangle into MovieClip and name it as “msgBkg_mc” or any other name you like. Now add a Drop Shadow filter to this selected MovieClip from the property inspector.
Now with the “Static” textfield, type “Game Over” and place it in the middle, or near the top of the rectangle.
Then create a button and give it an instance name as “restart” in the property inspector.
Select all these newly created objects and convert them into a single MovieClip and give it an instance name as “gameOver_DiagBox” in property inspector.
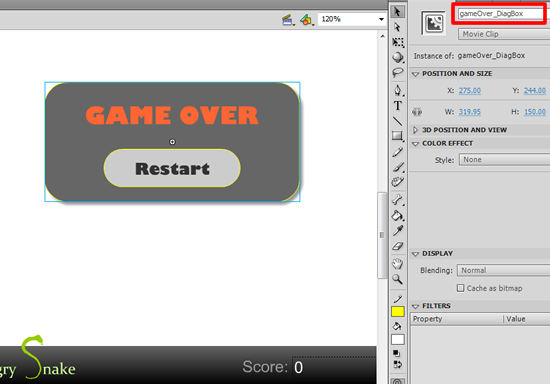
Now let us go back to ActionScript. The above “gameOver_DiagBox” must not be visible at the start of the game. So first we will make this box invisible. Add the following line to the “ini()” function,
gameOver_DiagBox.visible = false;
We will display this box when the snake dies. So we need to modify the “dead()” function as shown, (Bold line)
function dead():void
{
running = false;
stage.removeEventListener(Event.ENTER_FRAME, moveHead);
stage.removeEventListener(KeyboardEvent.KEY_DOWN, changeDirection);
addChild(gameOver_DiagBox);
gameOver_DiagBox.visible = true;
}
Test the movie.
Don’t you feel like the game is about to be completed? Last but not least, we need to make the restart button work.
Step 13 Restart the game
As the name suggests, this step will handle the important and crucial part of restarting the game. You might think that restarting the game is quite is easy. But, my friends, you have to take great care of reinitializing certain things that are essential at the start of the game.
So, let us create the “restartGame()” function as shown below:
//Restart game
function restartGame(evt:MouseEvent):void
{
score = 0;
score_TF.text = String(score);
frameNum = 0;
for (var i:int = 0; i < partsArr.length; i++)
{
//Remove snake from the stage
removeChild(partsArr[i]);
}
partsArr = [];
removeChild(food);
stage.addEventListener(KeyboardEvent.KEY_DOWN, changeDirection);
ini();
}
gameOver_DiagBox.restart.addEventListener(MouseEvent.CLICK, restartGame);
Observe each line in the above function. See what is initialized to make it available as a fresh and new entity. It is essential for every game developer to keep track of those variables, arrays, properties, events, etc. that need to be reset.
Test the movie.
Happy Heart….. Yet another addition to your knowledge.
So, friends, finally we have completed our basic structure of the “Hungry Snake” game.
Thanks for your patience. Hope you enjoyed the journey. Write comments with your suggestions and, if possible, motivation.
Conclusion
In this Flash tutorial we saw the complete process of creating a basic game like “Hungry Snake”.
There is still plenty of scope for improving this game including graphic design, keep increasing the speed of the snake (by decreasing the “span” amount) after a regular interval, etc.
In the final version of this game I have added one keyframe inside “head” MovieClip. So whenever the snake dies the playhead jumps to the second keyframe (which shows the graphics as snake is dead) and when game restarts it comes back to the first keyframe.
The techniques used in this game might be useful in other types of games as well. You never know which technique you will find useful in what situation. So keep thinking of these techniques.
Thanks. See you again. Watch out for a new Flash game tutorial coming soon.
[amember_protect guests_only] If you are already a Premium Member then just sign in and you can download the source files of this tutorial.Not a member? Sign up today or read more about our Premium Member area.
[/amember_protect] [amember_protect user_action=’hide’ visitor_action=’hide’] [/amember_protect]




Step 4 Creating a grid of tiles as background
I get 2 errors on this step which are
Error 1067
var columns:Number=stage.stageWidth/head/Width,
and
Error 1120
var rows:Number=(stage.stageHeight-(hugHeight))/headWidth;
on the second eror that is (hudHeight)) typo in comment
I had some issues with the lines that have
(var i:int = partsArr.length-1;i > 0; i-)
but I managed to fix it by changing it to
(var i:int = partsArr.length-1;i > 0; i–)
in case anyone else gets stuck where I was for awhile.
But now I’m at the end and I’m having some trouble with getting the restart function to work. After I click the restart button the snake’s head will change direction but not move, and I can’t figure out how to get it to work.
And I was also wondering about a way to make picking up food also increase the game speed
And Jamie, make sure you have the headWidth and hudHeight variables properly defined, if you still can’t get it to work try just doing the math yourself instead of bothering with the equation. Like with a headWidth of 25 and hudheight of 50 it should be
var columns:Number = 22
var rows:Number = 20
okay, apparently this site just formats two -‘s in a row weird. Explaining why I had the problem in the first place.
it should be (var i:int = partsArr.length-1;i > 0; i-[and then another]-)
with the “[and then another]” removed obviously
Is it possible to make the snake NOT die when reaching the boundary and instead teleport to the opposite end?
I’m getting a weird issue in that the game “works” (as in no compile errors), but I can’t move the snake or change its direction. The error I’m getting is from the “Output” tab and says:
TypeError: Error #1010: A term is undefined and has no properties.
at Snake_fla::MainTimeline/newFood()
at Snake_fla::MainTimeline/ini()
at Snake_fla::MainTimeline/frame1()
Not really sure what this means. But like I said, I get no compile/syntax errors.
Step10 Snake about to eat
when the snake grabbed the food , a new part didn’t attach to the snake’s body, there is no new food, and the score didn’t increase.
can someone help me about this….
ERROR 1093
var rows:Number = (stage.stageHeight–(hudHeight))/headWidth; //total num of rows for grid
var rows:Number=(stage.stageHeight-(hudHeight))/headWidth; //total num of rows for grid
try to retype it but not copy & paste…
i gt a problem here.
When the snake is eating …. the food and the head is overlapped.
how to solve it …. can someone help me??
i really need help….
Thanks
i have the same problem with joan…please someone help us..
i’m having problem with the scoring, not sure if im doing it right. The text box will diplay 0 until the first food is eaten then the text block will diplay nothing (blank). any direction?
Hi, my head turns but it doesnt move…
this is in changedirection function which i renamed.. i get no errors, runs fine but snake not moving
if(!moving);
{
stage.addEventListener(Event.ENTER_FRAME,movingHead);
moving = true;
}
}
You tutorial sucks, and it fails on me, I did everything right.
Ok ive had enough. Every step in this tutorial has holes in it and the problem im having at the moment hasnt even been solved after the same person asked about it TWICE! This tutorial is more frustrating than helpful.
Having a bit of a glitch, it seems that the first attached body part is put in the same square as the head and everyone after that into the correct space.
i have a small doubt.is the programming language used is java,and what is the software used.
Action Script 3
Jeez people. This tutorial does not suck. Its pretty damned good.
If you can’t follow it, its not the tutorials fault.
Thats fine if you get lost, but to blame this guys hard work, which does actually work, is just stupidity on your half.
You can’t step willy nilly into it and get it right first time without any prior knowledge of AS3, so you work at it.
But it seems like a few of you gave up at the first error.
Hi
This is really a nice tutorial I have made same game for Ipad using touch
events
just little confusion is body rotation when body move use this
for (var i:int = partsArr.length-1;i > 0; i–)
{
partsArr[i].y = partsArr[(i-1)].y;
partsArr[i].x = partsArr[(i-1)].x;
partsArr[i].rotation =partsArr[(i-1)].rotation; // this is added line
}
Thanks
hey I have a problem
these errors keep coming up:-
Scene 1, Layer ’tile’, Frame 1, Line 68 1084: Syntax error: expecting identifier before colon.
Scene 1, Layer ’tile’, Frame 1, Line 68 1084: Syntax error: expecting identifier before rightparen.
Scene 1, Layer ’tile’, Frame 1, Line 69 1084: Syntax error: expecting rightparen before leftbrace.
Scene 1, Layer ’tile’, Frame 1, Line 70 1084: Syntax error: expecting rightparen before semicolon.
Scene 1, Layer ’tile’, Frame 1, Line 70 1084: Syntax error: expecting identifier before rightparen.
Scene 1, Layer ’tile’, Frame 1, Line 70 1084: Syntax error: expecting rightbrace before leftbrace.
this is the code I’ve put in so any help as to what I’m doing wrong would be greatly appreciated
line 68: for (var:int = partsArr.length-1;i>0;i-)
line 69: {
line 70: if(food.x == partsArr.lenth-1;i>0;i-){
thanks in advance!
where is the source code?!
You have to be premium member in order to download the icons. You can join here: http://www.graphicmania.net/premium-membership/
Are you kiding me? so people are asking for help and none is given then litterally right above me as soon as someone asks for the source code he is told to go and sign up to a PAID service? i hope you feel bad as that disgusts me.
Dear Tom,
I am very sorry for this. But actually, many of the articles in the website is written my different authors, and guest authors. While, we try to provide support to the readers in the code and help them to understand the tutorials, some questions need reply from the author him self or other commenters. The authors is not working with us now and we tried to get him to reply these comments to the readers in vain. Alternately, we suggest that the readers get the source code as it may him them to better understand their questions. We also publish these questions as many other readers may collaborate to answer it. I hope this clarify the situation. Thank you so much
i understand that but what your doing is telling people to get the source code which you need to pay to get hold of. My issue is only partly with the little help but my main problem is that the first piece of help that is given is being told that i need to pay for something that im not particularly going to use again. The whole reason i came here was to follow a tutorial for a college assignment and although i no longer need it i do however feel let down by this.
Thanks Tom for sharing your ideas. Actually, we always try to help as far as we can and you can notice this in both our free or premium tutorials. What I can promise that I will try to get some one to help the users about this post and fix any code issue that the previous author did. I hope you keep trust our site and do not let this one article makes you feel upset from the site.
Hi I am having a small problem I am not getting any error and I have put in all the code for steps 1-10 but the snake dose not eat the food he just goes under it and dose not add a body part
So yeah..
Thanks a bunch for this great tut. It was a piece of cake.. however, I did it with buttons, as Im planning to publish it on touch devices. However, once the game restarts, the snake just doesnt want to move anymore, it just sits there. You can still make it look in every direction, but somehow, it doesn’t move.
How do I download the source files once I have become a member?
If the tutorial include a locked source file, you can join the membership and return to the tutorial page, you will find the download link in the end of the article. Let me know if you got any other questions.
[…] How to Create a Snake Game in Flash Using AS3 – Learn how to create a snake game in Flash using ActionScript 3… […]