How to Create a Vintage Floral Frame in Adobe Illustrator
2In today Illustrator tutorial, we will learn how to create a nice floral design that can be used in many different ways.

We will use the Pen Tool and some additional tools, such as the Direct Selection Tool, Convert Anchor Point Tool, Blend Tool and some Pathfinder features. For skilled Pen Tool users creating floral elements is quite easy, but in this tutorial we will learn how to avoid the use of the Pen Tool and create the floral elements by combining regular shapes.
You can click the download link at the end of the article to get the source files and the final look for the tutorial should be as below:

Step 1:
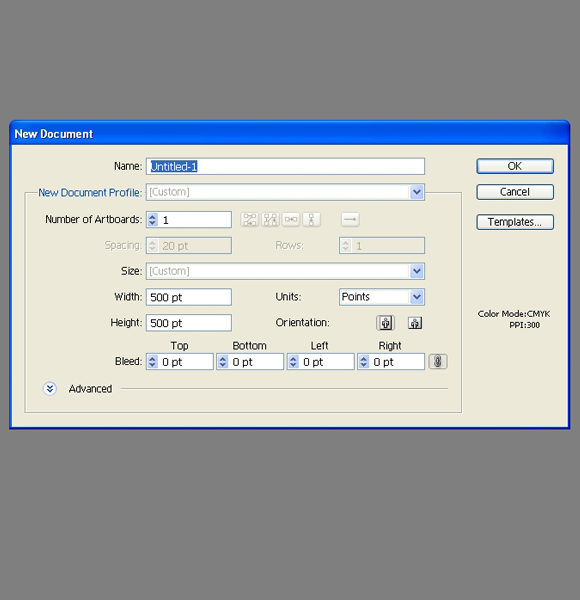
Create a new illustrator document of 500 x 500 pixels in size.
Step 2:
Let’s start with some simple floral elements.
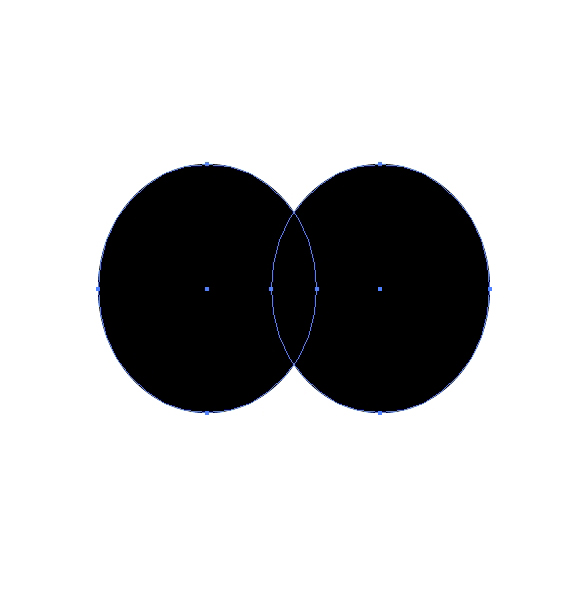
Grab the Ellipse Tool (L) from the Tool Panel and create the ellipse as shown in the picture below.

Step 3:
Duplicate (Ctrl / Cmd +C, Ctrl / Cmd + F) the ellipse and move it to the left. Group (Ctrl / Cmd + G) both of them.
Step 4:
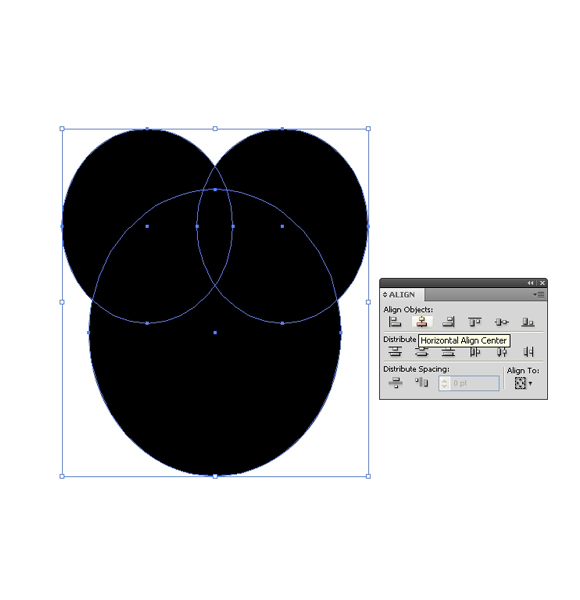
Create another copy (Ctrl / Cmd + C, Ctrl / Cmd + F), scale it up and place it as shown in the picture below. Select all the elements and align them using the Horizontal Align Center feature under the Align Panel.
Step 5:
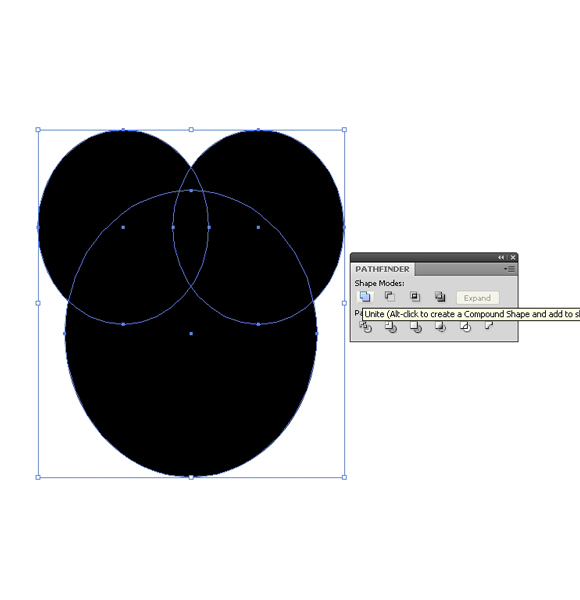
Let’s turn those elements into one object. Select them all and hit the Unite button under the Pathfinder Panel.
Step 6:
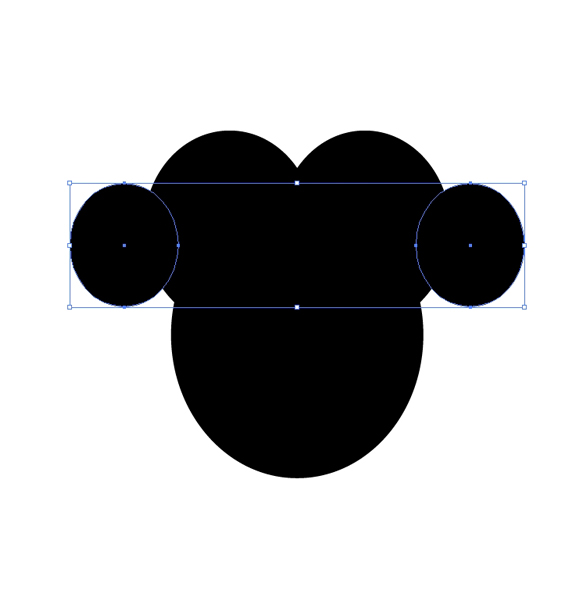
Grab the Ellipse Tool (L) again and create another ellipse. Duplicate it (Ctrl / Cmd + C, Ctrl / Cmd + F) and, holding the Shift key on the keyboard, drag the copy to the left. Place the ellipses as it is shown in the picture below.
Step 7:
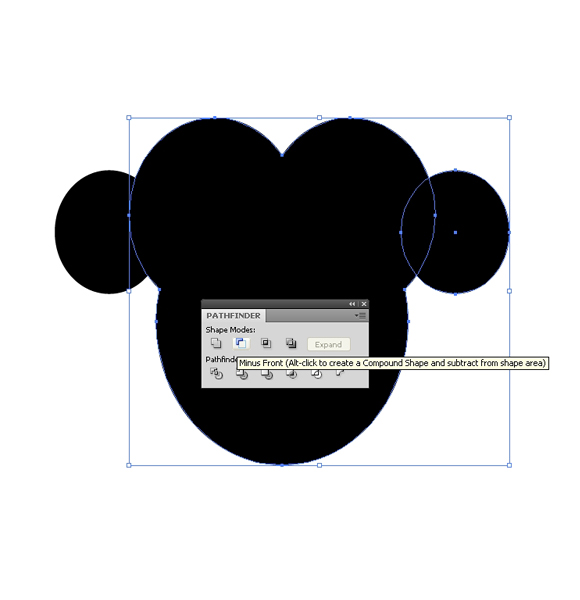
Select the large shape and one of the ellipses and under the Pathfinder Panel hit the Minus Front button.
Step 8:
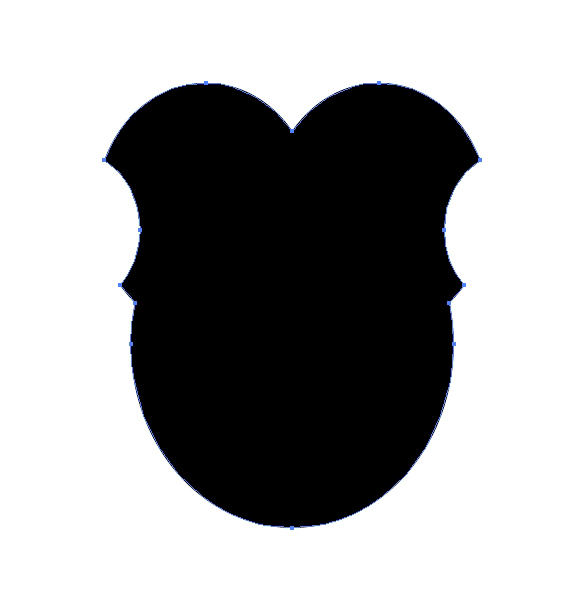
Do the same with the other ellipse. You should end up with something like this:
Let’s continue by creating floral elements.
Step 9:
Grab the Ellipse Tool (L) from the Tool Panel and create a circle.

Step 10:
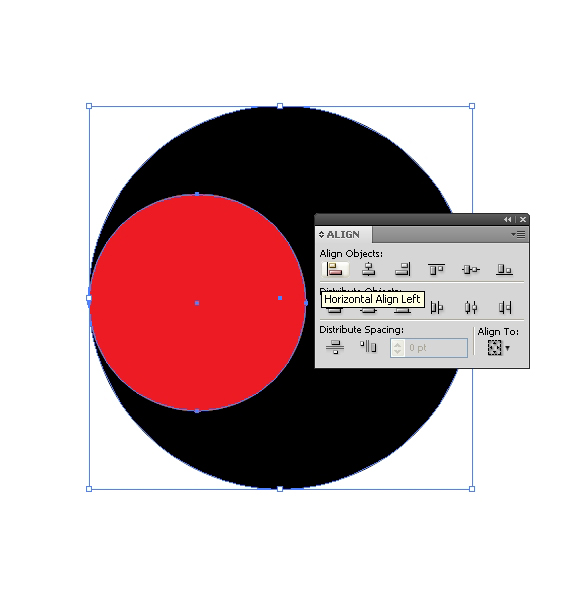
Duplicate the circle (Ctrl / Cmd + C, Ctrl / Cmd +F), set the Fill color to red (or anything else other than black) and align it with the larger circle using the Horizontal Align Center feature under the Align Panel.
Step 11:
Now we will need another, smaller circle. Make sure to place the circles so that they touch each other.

Step 12:
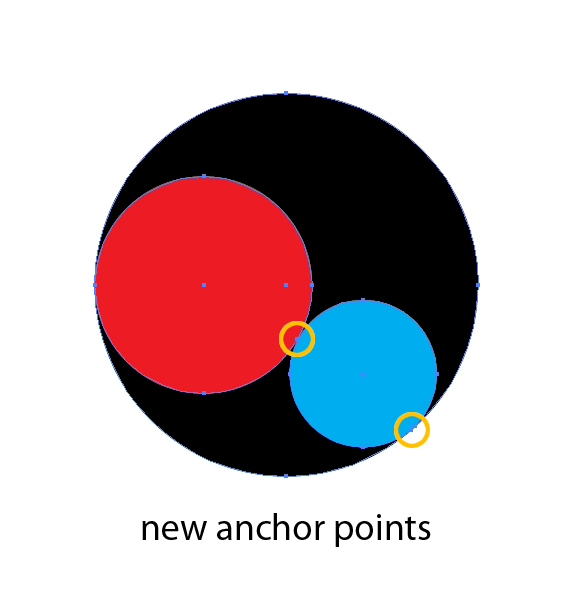
Now we have to add and remove some anchor points. At the places where the circles are touching each other add the anchor points using the Add Anchor Point Tool (+).
Step 13:
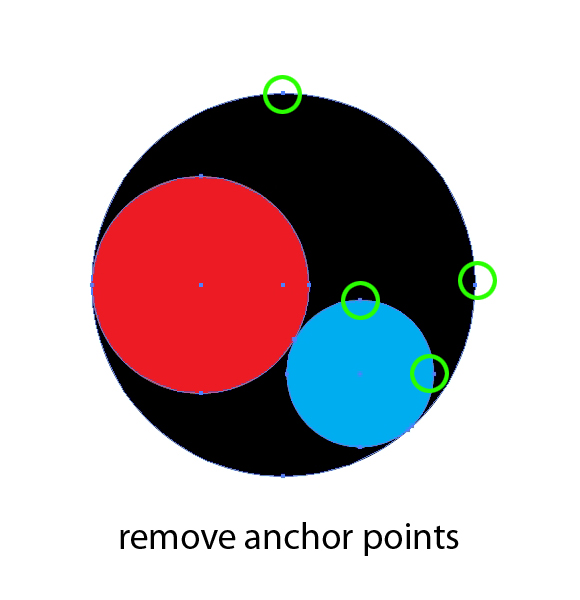
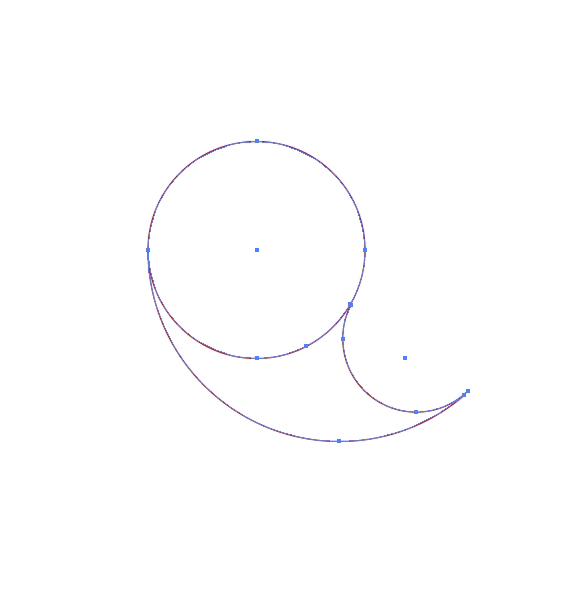
Grab the Direct Selection Tool (A) and remove the anchor points as shown in the picture below. To be sure of what you are doing remove the Fill color and set the Stroke color.
Step 14:
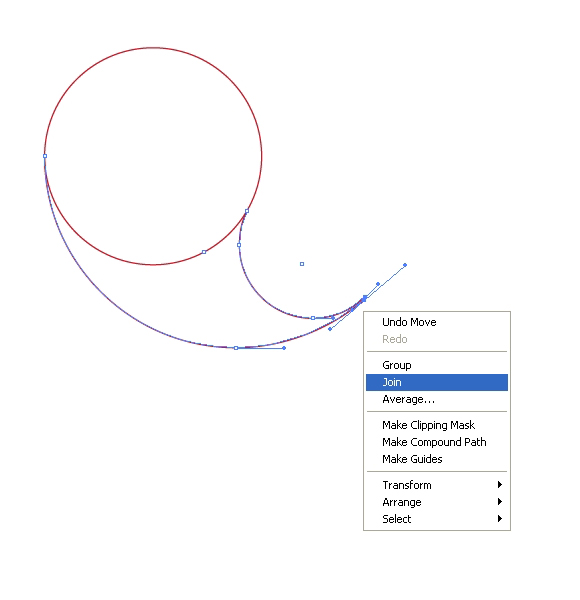
Grab the Direct Selection Tool (A); select the end anchor points, right-click and hit Join.
Step 15:
Select all the elements and in the Pathfinder Panel hit the Unite button. Set the Fill color to black (#00000).You should end up with something like this.

Let’s create some swirly elements now.
Step 16:
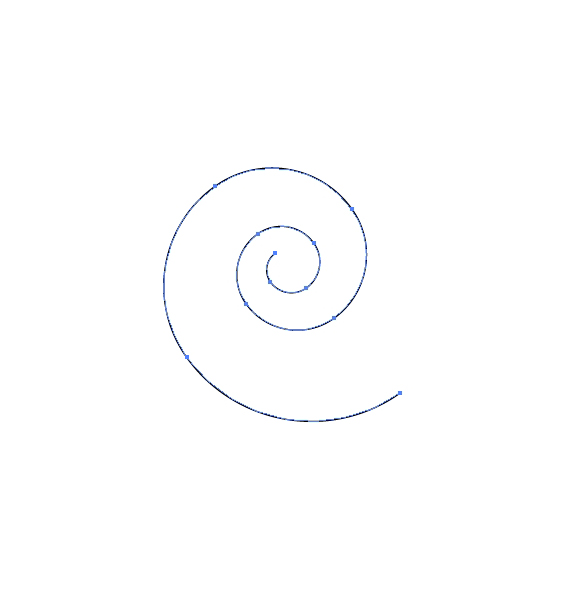
Grab the Spiral Tool from the Tool Panel and create a path as shown in the picture below.
Note: you can increase or decrease the number of arcs during the creation of the swirly path by hitting the up or down keys on the keyboard.
Step 17:
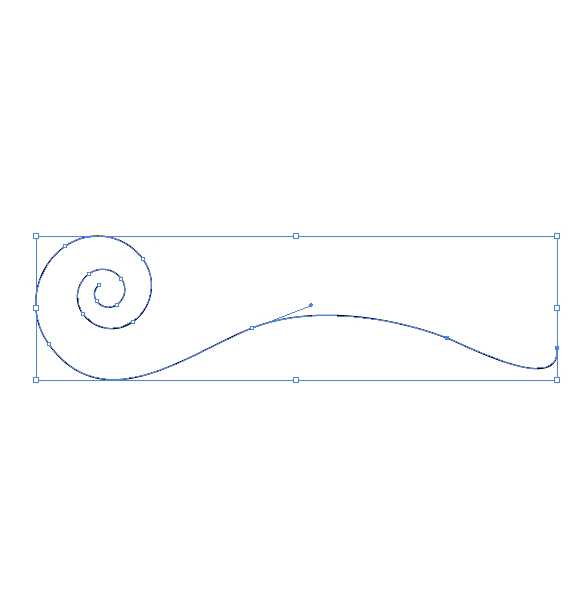
With the Direct Selection Tool (A) remove the last anchor point. Grab the Pen Tool (P), extend the path and rotate it by 90 degrees. Feel free to increase the value of the Stroke if you think it will result in a better look.
Step 18:
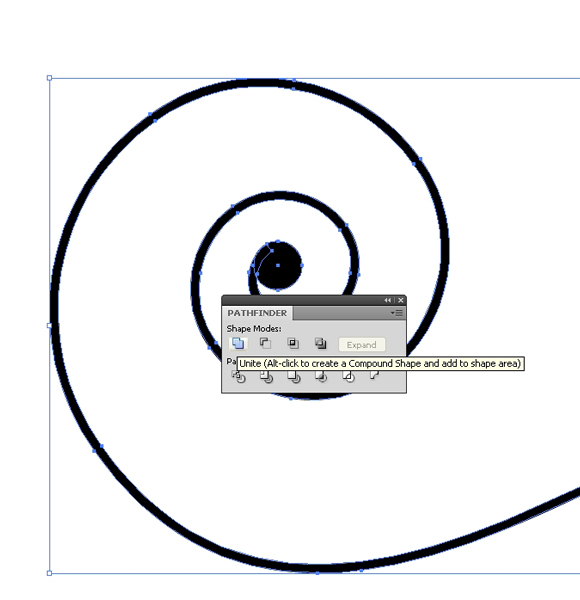
Under the Object, select Expand. Grab the Ellipse Tool (L) from the Tool Panel and create a small circle. Place it in the middle of the swirly path and hit the Unite button in the Pathfinder Panel.
Step 19:
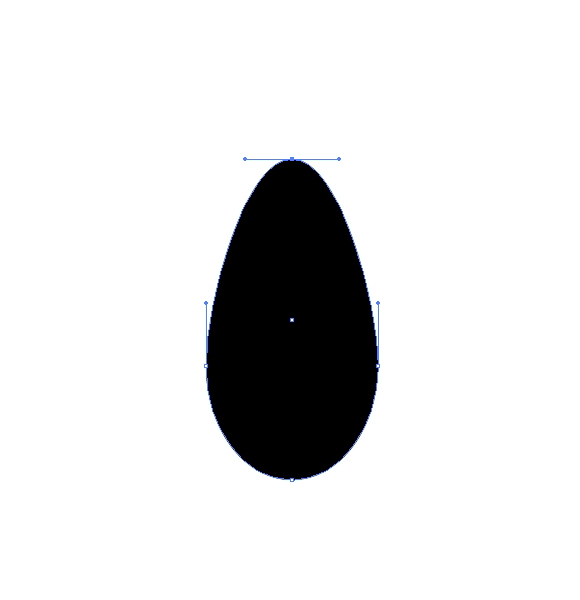
Let’s create some leaves. Grab the Ellipse Tool (L) and create the ellipse. Select the upper anchor point and drag it upwards with the Direct Selection Tool (A). (For smooth dragging, don’t forget to hold down the Shift key on the keyboard while you are doing this).
Step 20:
Grab the Convert Anchor Point Tool (Shift + C) and click on the upper anchor point. It will create a sharp corner.
Step 21:
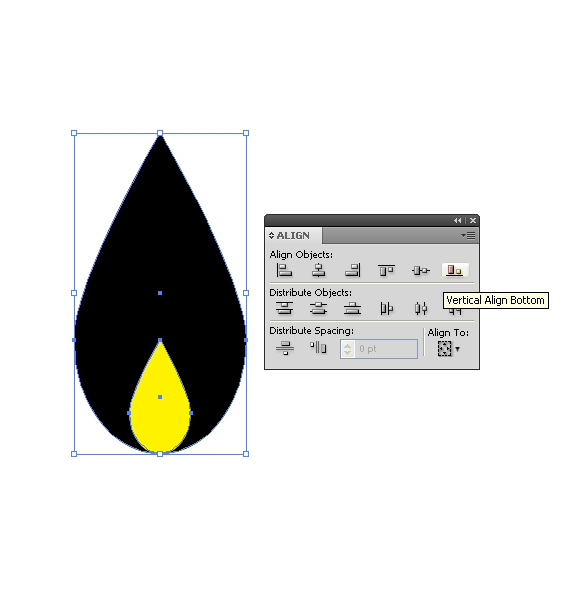
Duplicate (Ctrl / Cmd + C, Ctrl / Cmd + F) the shape of the leaf and scale it down. Align both copies using the Vertical Align Bottom feature in the Align Panel.
Step 22:
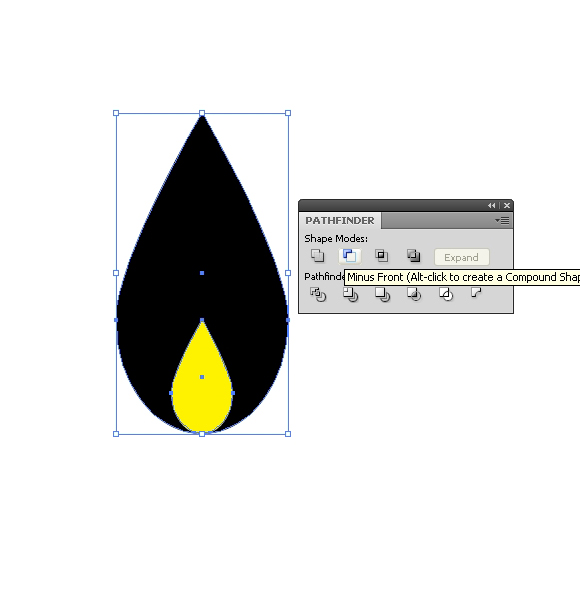
Select both shapes and hit the Minus Front button in the Pathfinder Panel. It will create a hole in the leaf.
Step 23:
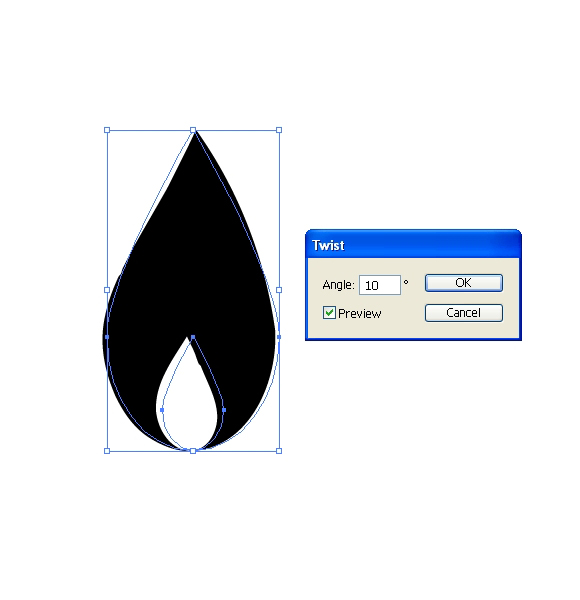
Under Effect, select Distort & Transform > Twist. Set the value for the Angle to 10 degrees. It will twist the leaf a little bit, but you will notice that the edge of the leaf is not smooth anymore. To fix that, we will have to remove some of the anchor points.
Step 24:
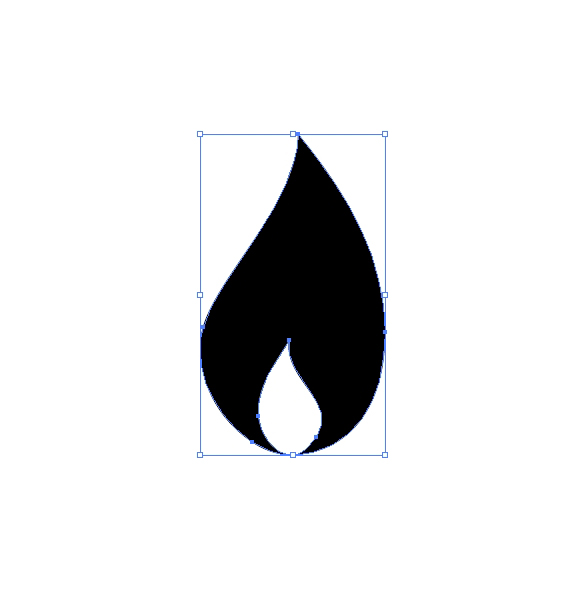
Under Object, select Expand Appearance. Grab the Delete Anchor Point Tool (–) from the Tool Panel and remove the anchor points that are making our leaf look rough. Feel free to adjust other anchor points as well. It does not have to look perfect.
Step 25:
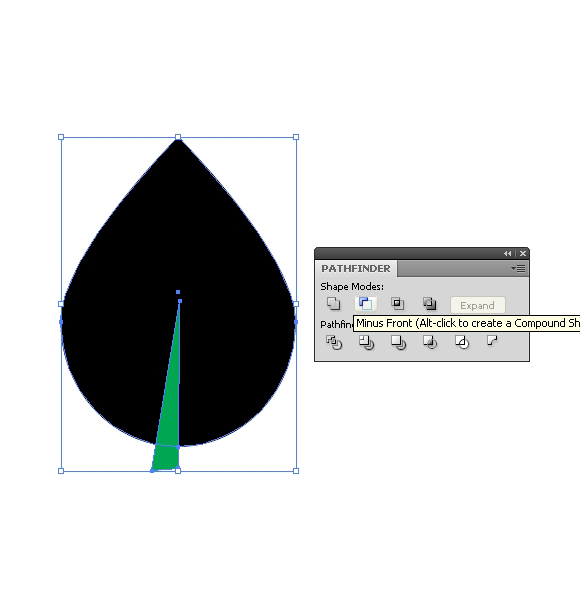
Different kind of leaves can be created in a very similar way. Repeat the previous steps to create the shape of the leaf. This time create small and “chubby” leaves. Grab the Pen Tool (P) from the Tool Panel and create an irregular triangle as shown in the picture below. Select both shapes and under the Pathfinder Panel hit the Minus Front button.

Step 26:
Let put our elements together, just to get the idea what we are creating. Along the creation process we will add some new elements.
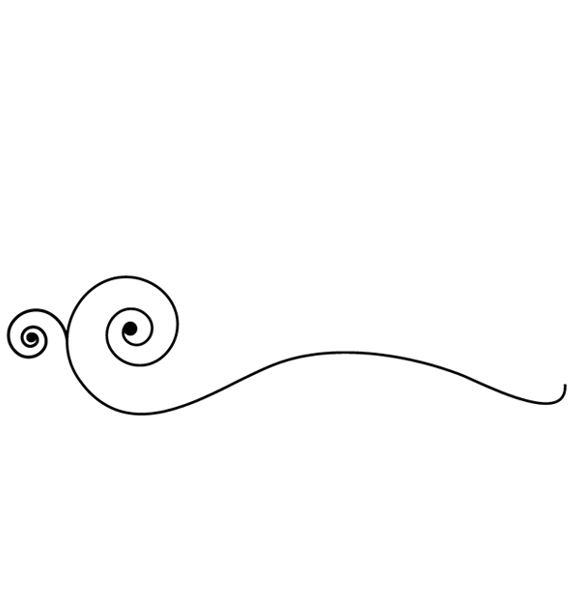
We’ll start with our swirly path. Create another one in the opposite direction and attach it to the one we already have.
Step 27:
Here we will add some leaves.

Step 28:
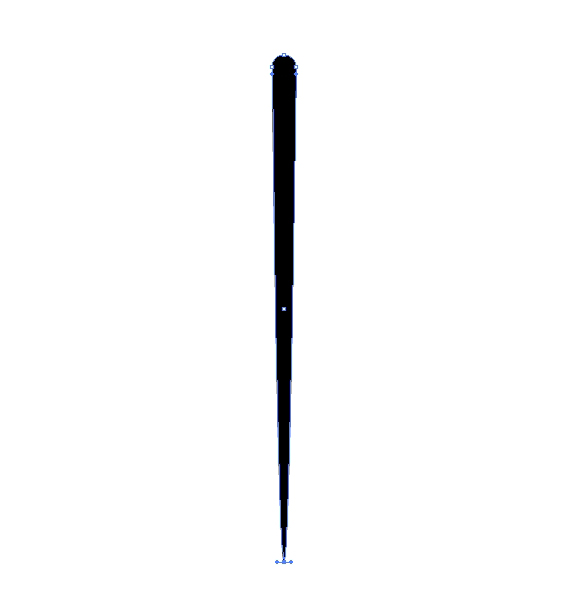
Grab the Ellipse Tool (L) from the Tool Panel and create a small circle. Click on the lower anchor point with the Direct Selection Tool (A) and drag the anchor point downwards, holding down the Shift key on the keyboard.
Step 29:
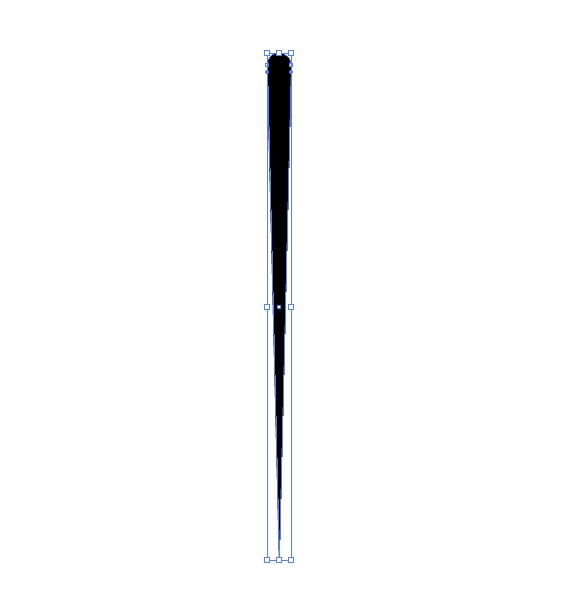
With the Convert Anchor Point Tool (Shift + C) turn the lower anchor point into a sharp corner. Just click on it.
Step 30:
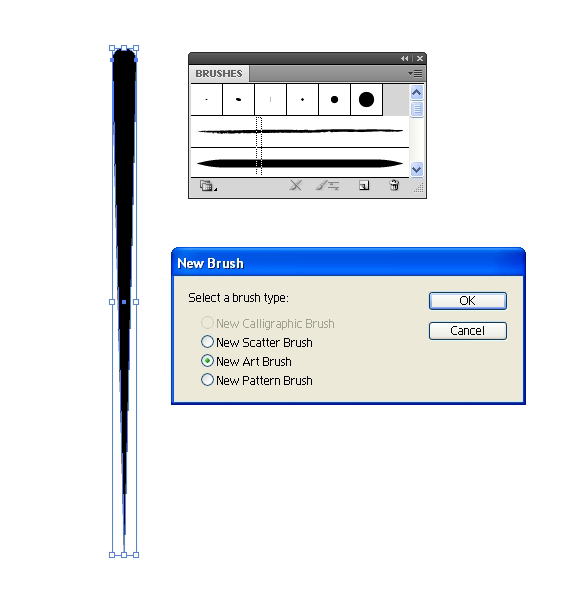
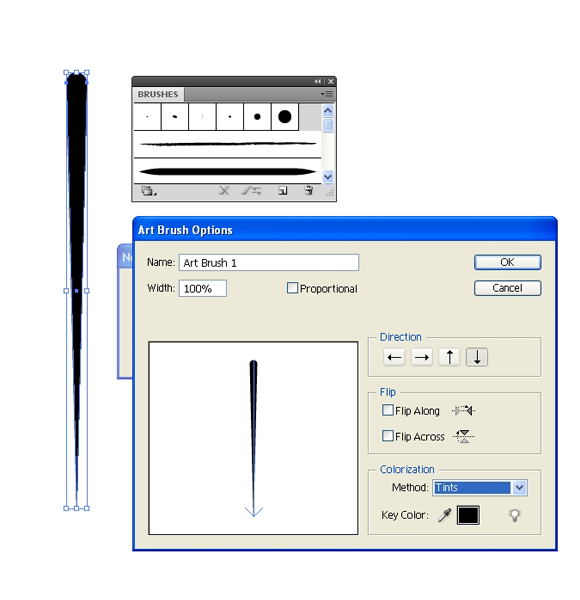
Grab the element we have just created and drag it to the Brush Panel. A new window will pop up. Check the New Art Brush and hit OK. In the Art Brush Panel set the Method for Colorization to Tints and hit OK.
Step 31:
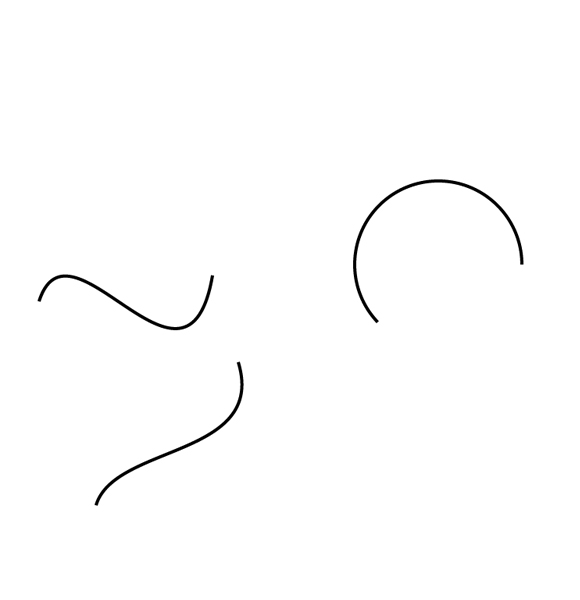
Grab the Pen Tool (P) from the Tool Panel and create some paths as shown in the picture below.
Step 32:
Apply the brush we have just created to all curves.

Step 33:
Under Object, select Expand Appearance and place them as shown in the picture below.

Step 34:
You can do a few more adjustments with the Direct Selection Tool (A). Feel free to move the anchor points and its handles, or remove some of them in order to create a nice floral design.

Step 35:
Grab the Pen Tool (P) from the Tool Panel and create the path as shown in the picture below.

Step 36:
With the Ellipse Tool (L) create a small circle. Duplicate it (Ctrl / Cmd + C, Ctrl / Cmd + F) and move the copy to the left. Scale it down a little bit.

Step 37:
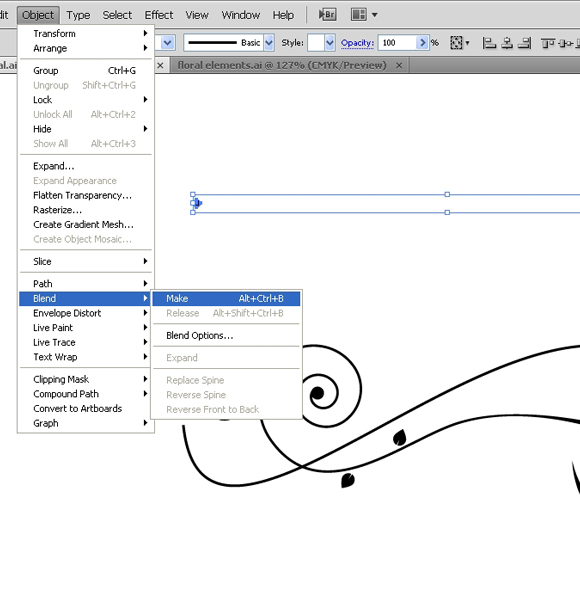
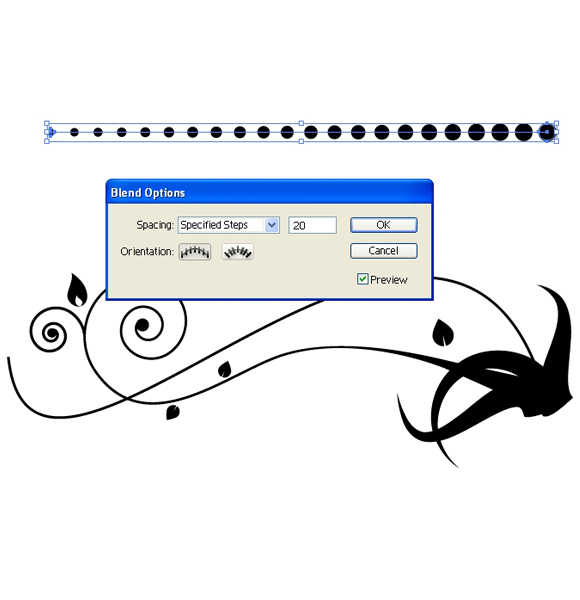
Select both circles and under the Object, select Blend > Make.
Step 38:
Under the Object > Blend > Blend Options set Spacing to Specified Steps and the value to 20. It will create a row of acceding circles.
Step 39:
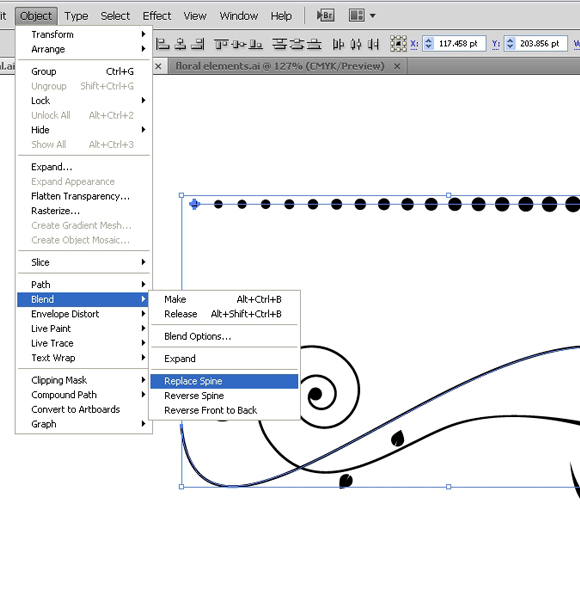
Select the row of the circles we have just created and the curve we made a few steps earlier, and under Object, select Blend > Replace Spine.

Step 40:
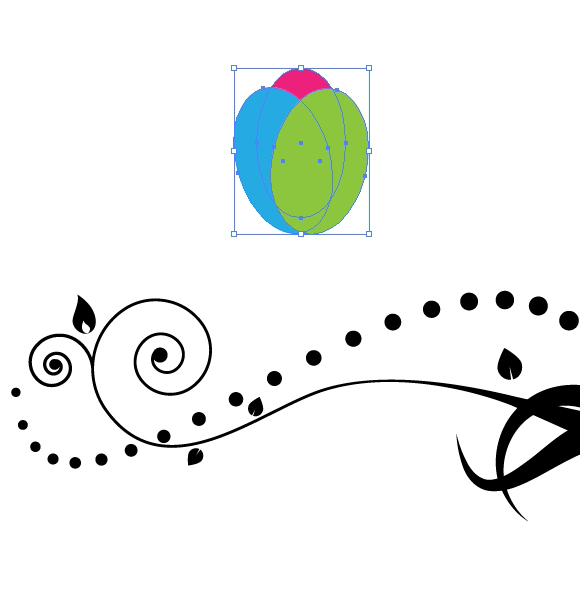
We will need one more detail for this part of the floral design. Grab the Ellipse Tool (L), create three ellipses and place them as shown in the picture below.
Step 41:
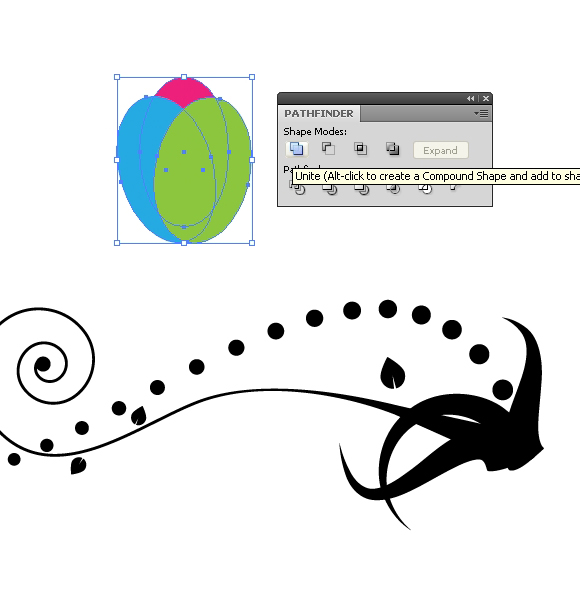
Select them all and hit the Unite button in the Pathfinder Panel. Set the Fill color to black (#00000).
Step 42:
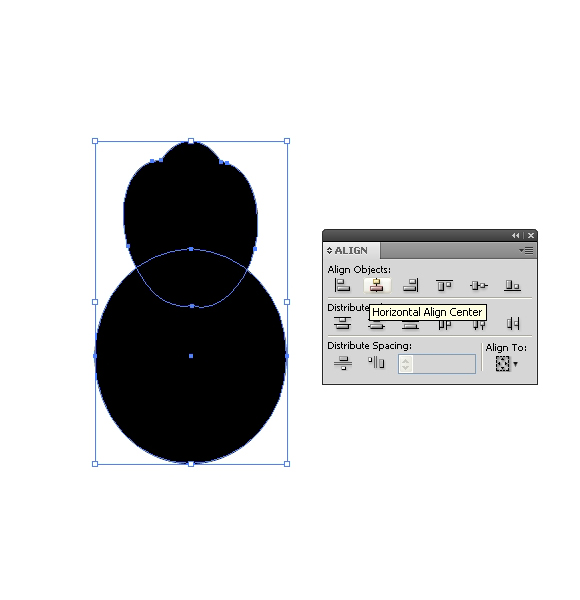
Create another ellipse and align it with the shape from the previous step, using the Horizontal Align Center feature from the Align Panel.
Step 43:
Under the Pathfinder Panel hit the Minus Front button. You should end up with something like this.

Step 44:
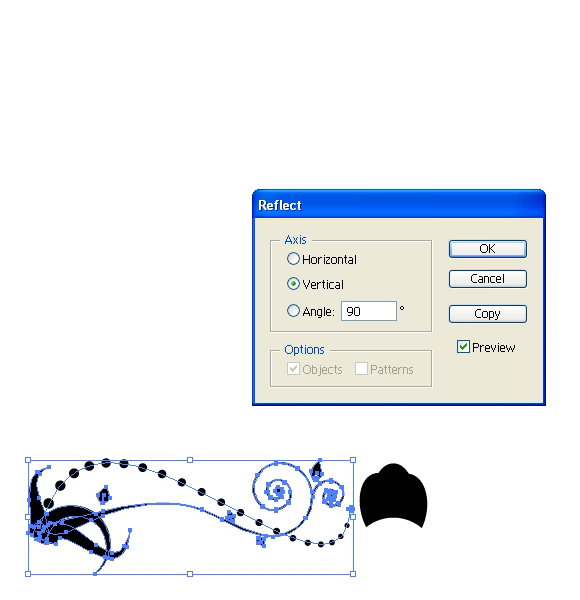
Let’s put all the elements together. To create the mirror image, use the Reflect feature. You can find it under Object > Transform. Set the Axis to Vertical and hit the Copy button.
Step 45:
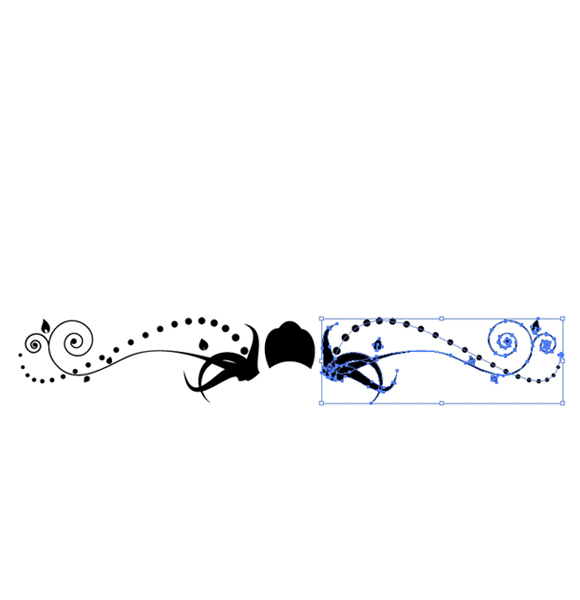
Place the copy we have just created on the right side.
Step 46:
Using the same techniques we have described in this tutorial, create more floral elements and combine them. You can achieve amazing results. Feel free to use a combination of colors, it will give your design a nice look.

Conclusion
In this tutorial we have shown that floral elements can be easily created with a simple combination of some ordinary objects. The Direct Selection Tool can be very useful for adjusting anchor points. Do not hesitate to explore the Pathfinder Panel and all its features. You might be surprised by the all the possibilities that the Pathfinder Panel can provide. If you have any comments or questions, please post them in the comment section below. I hope you liked this tutorial, and thank you for following along!
[amember_protect guests_only] If you are already a Premium Member then just sign in and you can download the source files of this tutorial.Not a member? Sign up today or read more about our Premium Member area.

[/amember_protect]
[amember_protect user_action=’hide’ visitor_action=’hide’]




I was trying to figure out if you have a facebook page.
Kudos for this astonishing post.
[…] How to Create a Vintage Floral Frame in Adobe Illustrator […]